No, a domain doesn’t have to be cancelled manually. A termination automatically results if the renewal bill of the domain won’t get paid. More information can be found at cancelling domain.
How can I cancel a domain?
It’s not necessary to separately cancel a domain. If the bill of the domain won’t be paid, it will be cancelled automatically.
But if you want to quit the domain instantly, you can request it in your webinterface. You can also do that shortly before the domain expires to feel extra safe.
All you have to do is click on ”Domains” and on ”manage domains” (-> dt. ”Domains verwalten”).

The active domain listing gives you several options. Click on the corresponding row the remove symbol to open a form.
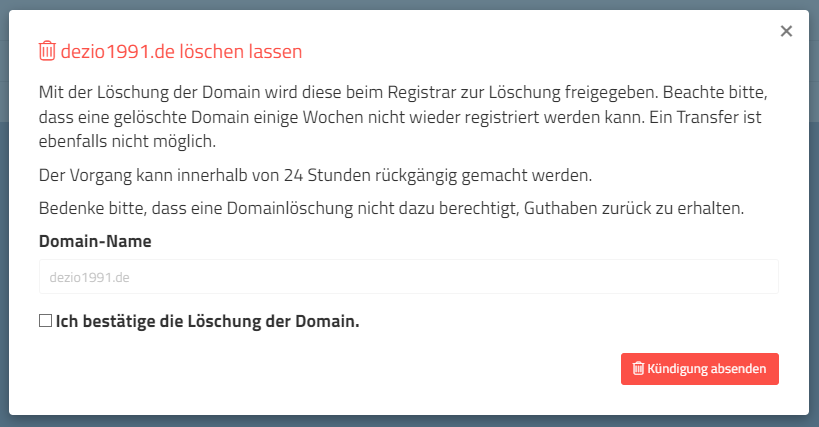
Fill in the form and send it off – the cancellation will be queued for the next midnight.
Please notice: A domain cancellation is permanent – the domain can’t be registered again for 30-60 days after the day of cancellation.
How can I change the nameserver?
When it comes to domains, you have probably heard the term nameserver before. In general, a domain always requires at least two nameservers.
What is a nameserver?
A nameserver responds to DNS queries for a domain. There are different types of nameservers.
Authoritative nameserver
An authoritative nameserver is the nameserver responsible for a domain. For example, when you order a domain from Prepaid-Hoster, we set our 3 kramer-dns.de servers as authoritative nameservers. These are then the main nameservers for your ordered domain. All DNS records are stored here.
But you can also use your own nameservers. For example, Cloudflare. There is also the option to use your own infrastructure. It is important that all nameservers respond with a valid SOA record.
There are rules for your own nameservers:
- The nameservers must return a valid SOA for the domain (authoritative)
- All nameservers must return the same records
- You must operate at least 2 nameservers with different IPs
- Advantageous: The nameservers are provided by two different providers
Recursive nameserver
A recursive nameserver is equivalent to a cache nameserver. To prevent a domain nameserver from suffering from the load of many queries, your internet provider inserts its own nameservers, which cache queries. The most well-known ones are Google DNS (8.8.8.8) and Cloudflare DNS (1.1.1.1). These servers cannot be used as nameservers for a domain.
Changing domain nameservers
Log in to the web interface and navigate to the domain list. Then click on “Nameserver” for the domain for which you want to change the nameservers.
Then click on “Edit” to set new nameservers.
A form will open. Please enter an authoritative nameserver that you want to set.
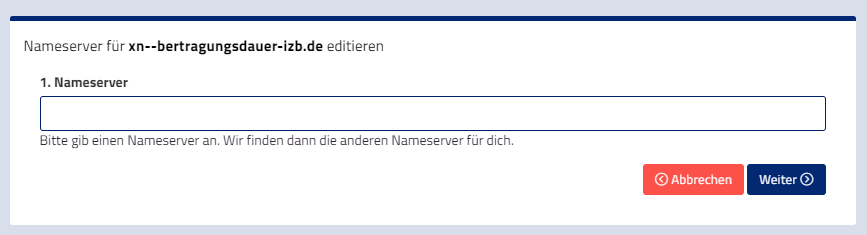
By clicking on “Next”, Vionity checks the other nameservers based on the NS entries in the entered server and suggests setting them. If the nameserver is not accessible, does not respond, or does not know your domain, the process fails.
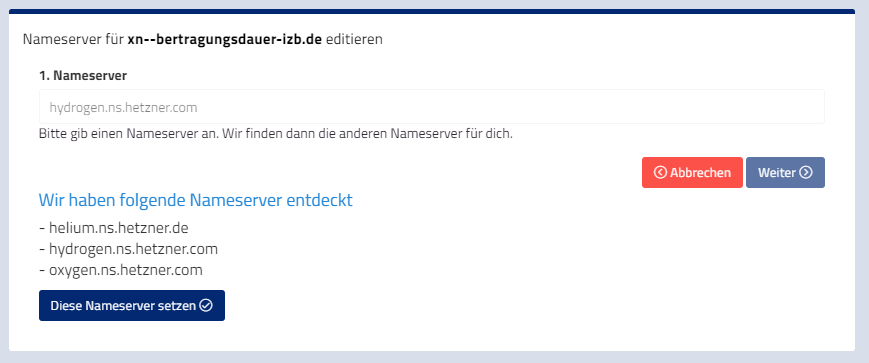
By clicking on “Set these nameservers” the change is submitted to our registrar. This can take a few minutes, but it is processed in the background.
Your nameservers should become active within the next 24 hours.
Glue records
If you need a glue record, please contact our support. We will need the nameserver domains and associated IP addresses. We will set it up for you as soon as possible.
My domain is ”locked”, how can I change this?
If your domain has the status ”locked” it couldn’t get transferred from one registrar to another. After some time this status is set automatically to avoid abusive transfers.
Please notify our support if you want to change the status to ”active”. That’s required if you want to transfer a domain – we will handle this for you then. Please also notice that the status can change automatically back to ”locked” after a few days.
Don’t worry, we won’t prevent you from transferring your domain – we will answer your ticket as soon as we can.
How can I connect my domain to my webspace?
If you want to connect your domain to your webspace you have to enter the IP-address of your webhosting in the DNS-settings.
To find out the IP- address, we have to follow a few steps:
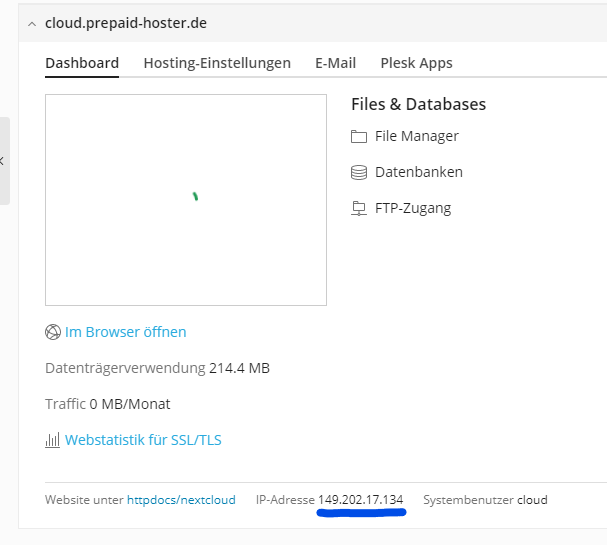
- Login into Plesk.
- Create the desired domain.
- In the overview you can see the IP-address of your webhosting.
- Have a look into the DNS-settings of your domain provider.
- Create an A-Record without any name and paste the IP address in the content.
- Create another A-Record with the name * (asterisk) and paste the IP address in the content.
It could take up to 24 hours until your domain is connected to the webspace package. Usually you can add SSL-Certificates immediately.
Please notice that it is possible that you may receive different IP-addresses for new domains in Plesk.
How Can I Connect to My Server via FTP?
How to Connect via FTP/SFTP to Your vServer
A vServer without FTP access? Unthinkable! If you want full control over your server, accessing it via FTP or SFTP is essential. Here you will learn step by step how to connect with FileZilla or WinSCP quickly and easily.
Prerequisites
By default, there is no FTP server installed on your vServer. To use FTP/SFTP, you first need to configure the server via SSH.
If you want a secure connection, we recommend using SFTPâit works directly with your SSH access and is encrypted by default.
Connecting with FileZilla via SFTP
- Open FileZilla â Launch FileZilla and enter the server address (your server’s IP address) in the “Host” box in the Quickconnect bar.
- Enter Username â The default is “root” unless you have set up a different user.
- Enter Password â Use your Root password which you received via email. If you have changed it, use your new password.
- Set Port Number â For SFTP, this is always Port 22.
- Connect â Click “Quickconnect” or hit Enter.
- Confirm Warning â If a warning about an unknown host key appears, click “OK”.
You can now upload, download, and manage files!
Connecting with WinSCP via SFTP
If you prefer using WinSCP, follow these steps:
- Start WinSCP â Open the program.
- Add New Server:
- Protocol: Select SFTP.
- Server Address: Enter your server’s IP address.
- Username: Usually “root”.
- Password: Enter your Root password.
- Set Port â Default is Port 22 for SFTP.
- Save and Connect â Save the session and click “Login”.
- Confirm Security Warning â If you receive a host key warning, confirm it with “Yes”.
You are now connected to your vServer and can manage files!
FTP Server Credentials
| Username | root |
| Password | Root Password |
| Port | 22 |
| Protocol | SFTP |
Installing an FTP Server via SSH
If you need a traditional FTP server, you can install it like this:
- Connect via SSH â Connect to your vServer using SSH.
- Update Package Lists â Run the following command:
apt-get update - Install FTP Server â Use the command:
apt-get install proftpd - Adjust Configuration â After installation, customize the FTP server to your preference.
Important Note: FTP is unencrypted! Always use SFTP whenever possible.
Why SFTP?
SFTP (SSH File Transfer Protocol) is the secure alternative to FTP.
✔ Encrypted Transmission â Your data cannot be intercepted.
✔ No Extra FTP Server Needed â SFTP works over existing SSH access.
✔ Easy Setup â No additional software required.
Even Easier: The VionityCP Web Interface
If you wish to manage your vServer more efficiently, check out our VionityCP web interface. It allows you to manage your server directly through the browserâincluding FTP/SFTP access!
Now you know how to quickly and securely connect to your vServer. If you have any questions, feel free to contact support! 🚀
Connect a domain to Five-M
Domain at Prepaid-Hoster
If you want to connect a domain to your Five-M (CFX) server you just have to follow the upcoming steps:
- Login into the webinterface and click on your domain in the navigation menu to the left.
- Choose ”DNS-Settings” (dt. = DNS-Einstellungen).
- Click on the Button ”+ New SRV entry” (dt. = + Neuer SRV Eintrag).
- Select the service looking like “five m”
- Now fill in the following fields:
- Subdomain: Here you can either keep this field empty or you can note the subdomain you want to use.
- IP: Indicate the address (Domain or IP) of the Five-M server. It’s important that you don’t fill in the port.
- Destination-port: Enter the server port. Standard 30120
- Save your settings.
Domain at another domain provider
If the domain is registered somewhere else you may have to connect the domain and your game server manually. We can’t give any clearer advice because we don’t know your provider.
- Create an A-Record titled “server” (or something familiar) – assign the IP-address of your server on which the GTA Multiplayer mod is running as the content.
- We need to create a new SRV entry with the following properties:
- Name: _cfx._udp
- Priority: 10
- Weight: 10
- Port: Now you need the game server port – 30120 by default
- Content/Target: fivem.mydomain.com (here you need the Subdomain as shown in step one.)
Complete SRV entry:
- Name: _cfx._udp.mydomain.com
- Content: 10 10 30120 server.mydomain.com
Please notice that it can take about 24 hours until anyone can connect using the domain.
Windows Remote Desktop: Create user
If Windows is installed on your server, multiple users can work with it at the same time. But for that it’s needed to create a new user and activate the Remote-Desktop service (RDP).
Quick guide
- Create user
- Set password
- unlock this user for RDP
- login via RDP
In this article we explain step by step how a new user can use the windows server via remote.
Create a new user
Open the start menu and click on ”settings” – in the following window you click on ”accounts”. Click on ”other users” – there you can find a big ”add” button.
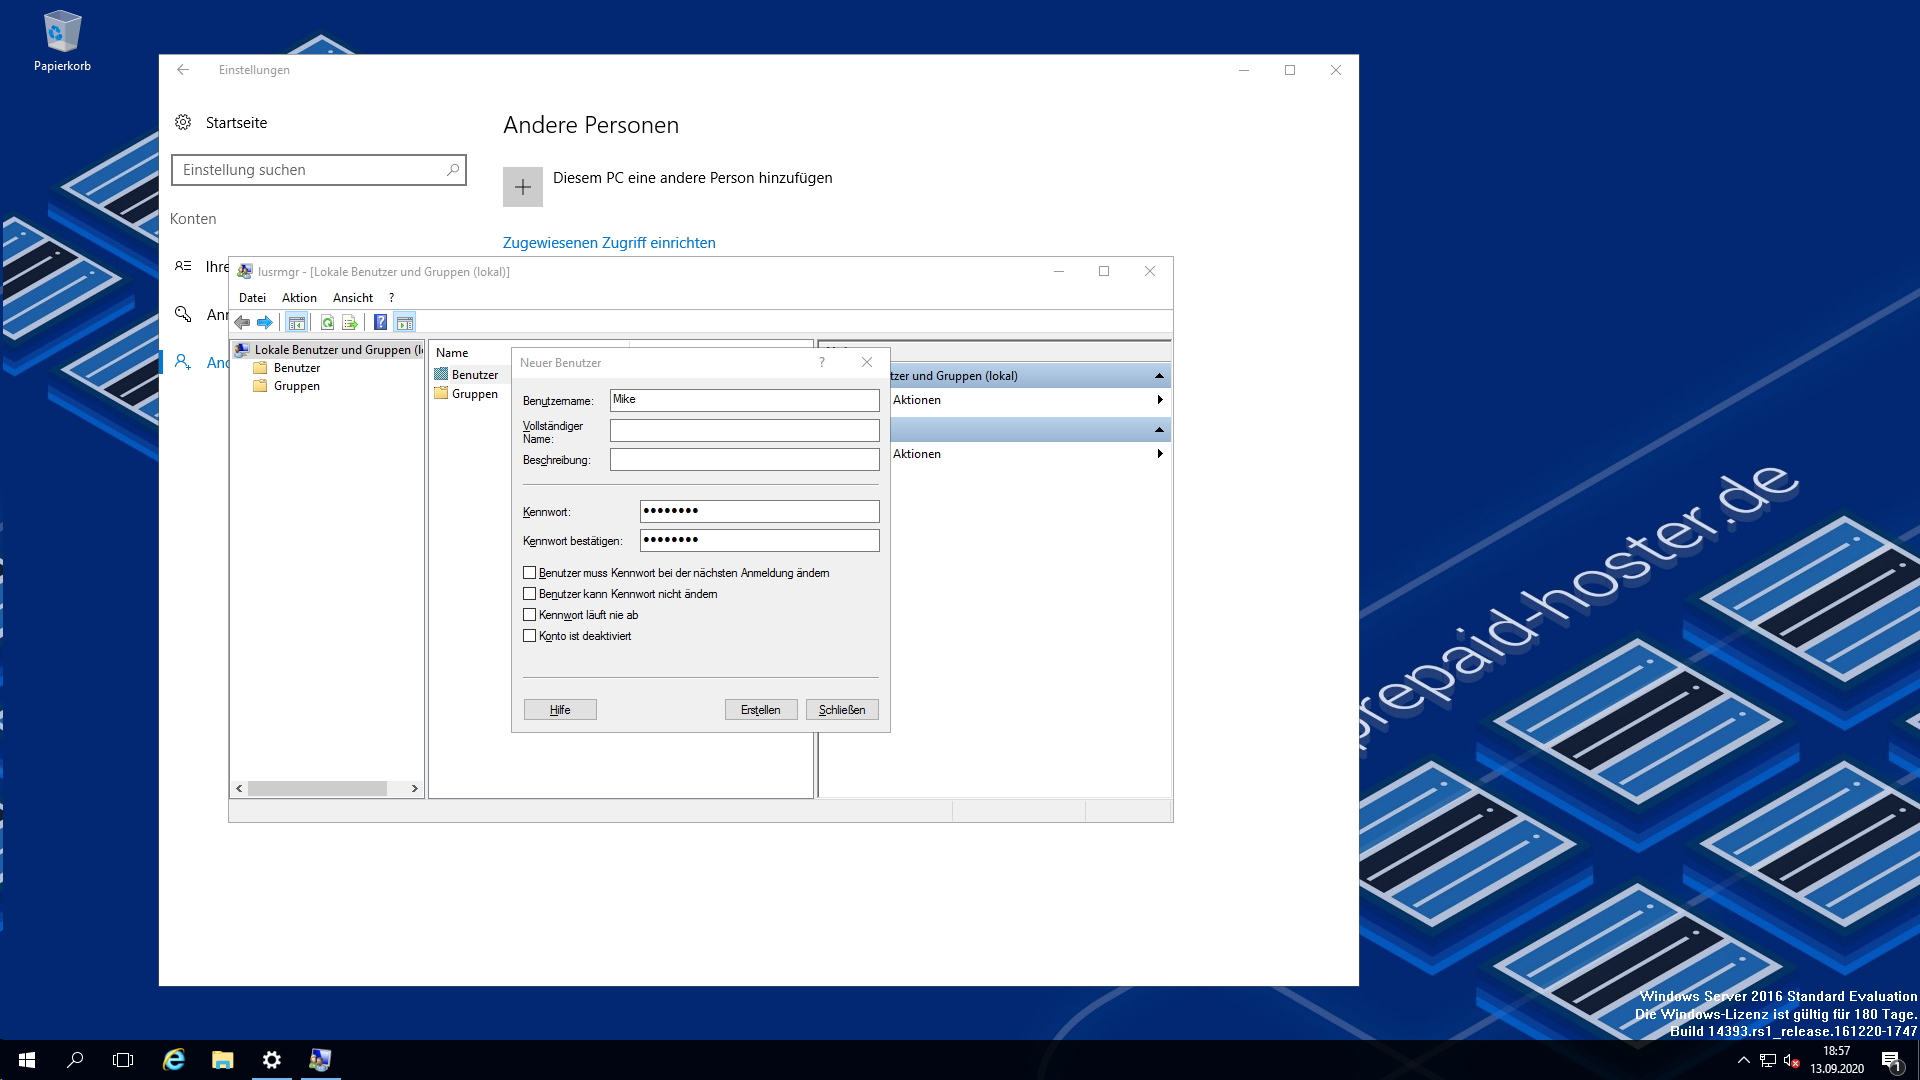
The user management opens. Do a right-click on ”user” and choose ”new user”.
Now you have to fill in the form. It’s important that username and password are set. Other fields can get filled in at will.
Activate remote desktop for the new user
The new user is registered in the system – so you can now activate the remote desktop.
Do a right click on the windows logo in the bottom left corner of your taskbar. Then click the entry ”system”. In the opening dialogue you choose ”Remotesettings”.
Now we are clicking the ”select users” field. A list of users will appear – the admin is set as unlocked to RDP by default. If we click the ”add” button – a search dialogue opens. In the big field you have to search for the newly created user and click on ”ok”.
Ultimately you have to confirm the upcoming dialogue-fields.
Login via remote desktop
The login is a little tricky because you have to enter the format ”computername/username”. Otherwise the user can’t get identified and the password will be shown as incorrect. You can find the computer name in the ”system” window that is still open. To make it easier note the characters.
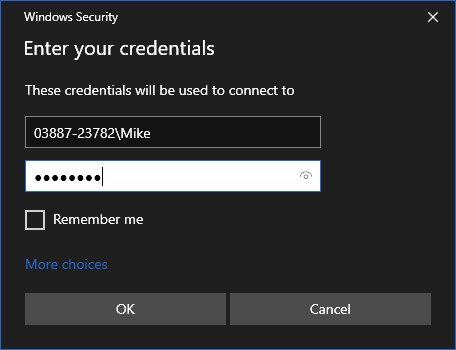
In our case the users full name would be 03887-23782\Mike. If the password you enter is correct – the new user is logged in.
Can I order additional IP addresses?
You can order multiple IP addresses for each Dedicated Server through our support. You can order a maximum of 6 individual IPs. Various subnets are also available.
| Description | Price | Setup |
| Per individual IP address | â¬2.50 | â¬10.00 |
| /29 IP subnet (8 IPs, 6 usable IPs) | â¬20.00 | â¬80.00 |
| /28 IP subnet (16 IPs, 14 usable IPs) | â¬40.00 | â¬160.00 |
| /27 IP subnet (32 IPs, 30 usable IPs) | â¬80.00 | â¬320.00 |
| One-time setup fee per IP address | – | â¬10.00 |
Please note that we need to know the purpose for ordering additional IP addresses. If we consider the purpose to be not meaningful, we may reject the order. This could be the case, for example, if the same result can be achieved through intelligent port usage. Therefore, please include your purpose directly in your support ticket.
How can I shut down my dedicated server?
A dedicated server can’t be managed as easy as a virtual server. A virtual server is able to start quickly because it is part of a physical system.
Dedicated servers have to support special motherboard-commands so they can get remotely started. Not every motherboard of our dedicated servers are supporting this. That’s why you shouldn’t shut down a dedicated server at all. We may have to send a technician to start the server manually. This can take some time.
If you have shut down your server by accident – feel free to contact our support.