My memory was not added after an upgrade!

You have the option to increase the memory of a virtual server at any time, as long as you have not yet reached the largest level. With OpenVZ servers, the memory is available immediately and without rebooting. With KVM servers, however, there are a few small things to keep in mind.

There are usually 3 reasons why the memory is not yet available to you after an upgrade.

The server must be restarted

If you change the storage capacity of a KVM server, you must stop and restart your server in the web interface. At startup, the change of the virtual hard disk is then carried out. In Linux-based servers, the new space is then assigned to /dev/sda1.

A snapshot is available

If a restart via the web interface did not cause any change, you may have snapshots active. Remove all snapshots and restart the server afterwards. Sometimes you have to contact the support to get them to restart the change process for you for free.

The freed space must be allocated (Windows)

When your hard disk is expanded, the freed disk space is not allocated to a hard disk drive (e.g. C:). You have to do that yourself. We explain how to do this in the article Extending Windows Hard Disk Space.

All this did not help

Feel free to contact us in support. We can then check what did not work. You will get your hard drive space in any case.

Open a Port in Windows Firewall

In this article, we will explain how to open a specific port in the Windows Firewall.

By default, a Windows Server does not allow any external connections. Ports need to be explicitly opened.

Imagine you are running a Minecraft server on your Windows Server. Your colleagues can only connect through port 25565 once this port is opened in the Windows Firewall.

Common Standard Ports

You can open more than just your Minecraft server in the Firewall. A variety of standard ports are available to ensure you are well-prepared.

Application Protocols & Port(s)
Minecraft Server TCP 25565
Teamspeak UDP 9987
TCP 30033
Webserver TCP 80, 443
CS2 Server TCP 27015-27030, 27036-27037
UDP 4380, 27000-27031, 27036
RDP TCP 3389
Ports to use with Windows Firewall

Connecting to Windows Server

First, connect to your Windows Server. You must act as an Administrator.

Open Windows Firewall

Search for “Firewall” in the Start menu.

Open Windows Firewall

Open the entry named “Windows Defender Firewall with Advanced Security”. A new program will open.

Add a Rule

In the new window, you will see an entry named “Inbound Rules” on the left. Right-click on it and select “New Rule” from the context menu.

An assistant will open to help you create the rule.

In the first step, you will be asked what kind of rule you want to create. Since we want to open a port, choose Port as the rule type. Click Next.

Now, identify which port and protocol your application uses.

Choose the correct protocol TCP or UDP and then enter the ports that apply to your program in the “Specific local ports” field. Then click Next.

Entering ports in the new inbound rule assistant

In the next step, choose the action. Since we want to allow the connection, select “Allow the connection”. Click Next.

In the second-to-last step, choose which connections this rule should apply to. By default, all connections are already selected. You can leave it as is and click Next.

The final step is easy: Give the rule a name. We recommend you use the name of the application you are allowing, such as “Minecraft Server”. You can also add a description if you like.

Assigning a name to an inbound firewall rule

With a click on “Finish”, you have successfully created the rule! The port is now open in the Windows Firewall and can be accessed from outside.

If you have any questions, please contact our support team. We are happy to help.

My server has updates! What now?

It is important to update your server at regular intervals. Every program can have security vulnerabilities, which can allow foreign code to be executed on your own server.

That is why we will show you in this article how to bring your server and installed packages up to date.

First, log into your server via SSH.

Debian

Step 1: Update package lists

apt-get update

Step 2: Update packages

apt-get -y upgrade

If you are asked if you want to overwrite a configuration file, choose “Install the package maintainers version” if you have not consciously made any changes to it.

If you are prompted to choose a disk for the boot process, select (Space) /dev/sda (the top one).

If you receive an APT error: This must be accepted explicitly before updates for this repository can be applied – we have already provided the solution.

Step 3: Update distribution

apt-get -y dist-upgrade

CentOS

yum update

If you are not making any progress, support can take care of the installation of updates for you.

How do I activate sound on my Windows server?

A virtual Windows root server is not equipped with its own sound card. This is because you usually don’t need speakers on the server in the data center. But that doesn’t mean you can’t have sound on your Windows server!

You can set the sound to be played on the server to be forwarded to your local device. This is a setting in the Remote Desktop Connection program from Microsoft.

To be able to listen to sound via Remote Desktop, a few steps are necessary.

Enable sound in Remote Desktop settings

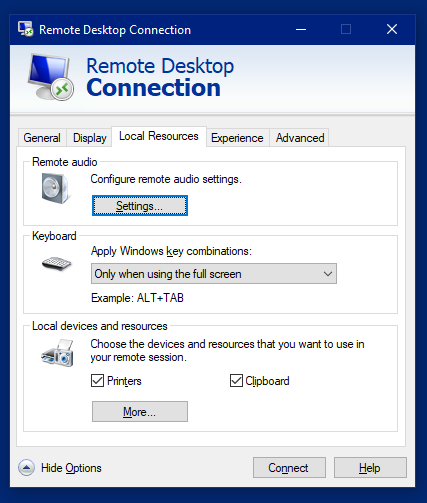
Open the Remote Desktop Connection program on your local computer and enter the IP address of your Windows server. Then click on “Show options” at the bottom.

Then navigate to the “Local Resources” tab. Here you can perform various settings, such as the transfer of drives, USB sticks and printers in your network.

Local resources

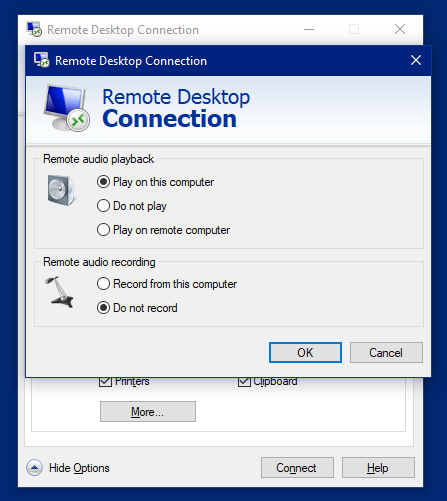
But in this case we are interested in the “Remote Audio” option. Click on the “Settings” button. A new dialog opens in which the options can be set.

Remote audio settings

Select the first entry for “Remote audio playback“. This is “Play on this computer“. Then click OK to save the setting.

Now connect to your Windows server as usual. You may need to make some settings there.

Windows Audio is deactivated

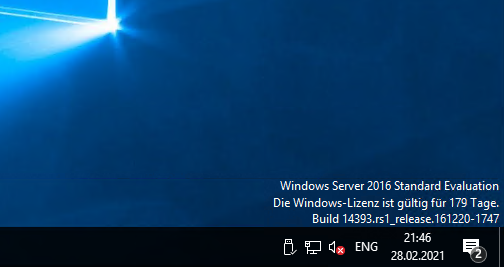
Usually, the Windows Audio service is disabled. This is because Windows could not detect audio output during installation. However, this service can be activated very easily.

Right-click on the icon with the round red cross and select “Output devices“. A new dialog opens.

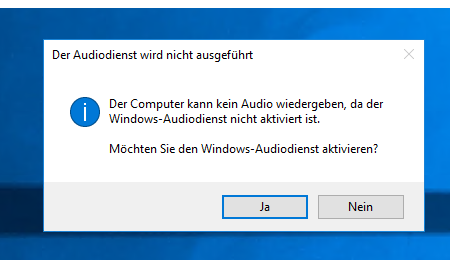
Audio service is not performed.

Confirm this dialog with “Yes” to activate the Windows Audio service.

Your Windows server can now play audio/sound/sound.

Check this, for example, by briefly watching a YouTube video. You should then be able to hear the sound on your headphones.

If this does not work, please contact us in support. We will be happy to help you.

Is There a Traffic Limit?

We place a high value on a balanced price-performance ratio. To ensure all customers benefit from fair pricing, we use the fair-use principle for traffic billing. This means there is no exact limit, but excessive use is restricted.

Why Is There a Limit?

If a customer with an inexpensive 4 Euro vServer uses 5TB within 20 days, it results in costs for us that far exceed the monthly server fee paid. Most customers use less than 1TB per month. Therefore, we don’t set a specific traffic limit in advance. However, if all customers used such large amounts of data, we would have to raise prices for everyone.

10 TB Included

From now on, some of our servers include 10 TB of traffic per month! This means you can utilize your full potential without worrying about extra costs. If you need more, we offer simple options to add extra traffic.

Burst Speed and Throttling

Depending on the server you have, we offer burst speed that can be used up to a limit of 10 TB per month with full bandwidth. After that, the bandwidth is reduced to 50 Mbps. In extreme cases, we reserve the right to throttle the speed to 25 Mbps.

Adding More Traffic

If you need more traffic at full speed, you can add extra traffic anytime. You can buy up to 10TB for 9.50 Euro per TB. From 10TB onwards, each additional TB costs 8.50 Euro. Please note that unused extra traffic will expire.

Allowed and Not Allowed Traffic

Not Allowed Traffic

  • VPN traffic outside your own household
  • Traffic from Tor nodes
  • Torrenting of copyrighted material
  • Proxy traffic like SOCKS-Proxy outside your household
  • IPTV
  • 24/7 live streams to platforms like Twitch or YouTube

These types of traffic cause constant or unfair traffic peaks and are therefore not allowed.

Allowed Traffic (within Fair Use)

  • High-traffic websites
  • Legally permissible download sites
  • Nextcloud or similar file transfers without public access
  • Game server content
  • Private VPN traffic for your own PC
  • Your own services for traffic optimization (like Reverse Proxy, Content Delivery)

Prices and Quotas

If you need extra traffic quota, you must book it in advance. Unused traffic will expire at the end of the billing period. Here are the prices:

  • Up to 10TB: 9.50 Euro per TB
  • From 10TB onwards: 8.50 Euro per TB

So if you want to book 2TB of extra traffic, it costs a one-time fee of 19.00 Euro. The extra traffic is billed monthly, and the billing date is always the same as the order date of the associated service.

How do I disable SSH password authentication?

If you have set up your Linux server to authenticate using an SSH key, it is recommended to completely disable password authentication. This greatly reduces the attack surface for your server.

Manually via SSH

Disabling password authentication is actually quite simple. Open the configuration file /etc/ssh/sshd_config with a text editor (e.g. nano).

Find the line

#PasswordAuthentication yes

Remove the “#” in this line. Replace “yes” with “no” at the end, so it should read:

PasswordAuthentication no

Save the file and restart the SSH server. You can do this with the command:

service ssh restart

Keep the current SSH session open and open a new session in a new window. Now, try to log in using the SSH key. If it doesn’t work, you should re-enable password authentication and resolve this issue.

Using the web interface

In the Cloud Manager, you can easily enable or disable password authentication in the VPS settings.

Go to the “SSH” tab and select the option “SSH Key Only” for “Root Login”.

Login with SSH Key only. Disable password authentication.

After saving, your server will only allow root login with an SSH key.

I have locked myself out of SSH

If you have locked yourself out, you can always connect to your server using VNC. There you can also use the root password, as it is not an SSH connection but a direct terminal connection. Otherwise, our support team is always available to assist you.

Anti-Hack: Why was my IP address blocked?

Our network providers use automated tools to protect your server and other servers. If your server engages in suspicious activities, your IP address will be blocked and the traffic will be stopped. This can happen if your server attacks other servers, sends spam emails, or scans networks. We also regularly check our abuse mailbox for such activities and manually review these cases to ensure that all violations of our terms of service are reported and appropriately handled. Please take the security of your server seriously to avoid violations of our terms of service and possible blocking of your IP address.

Costs

Activation €5.00
Optional data backup €15.00/15 mins, higher on weekends

Your IP address will be blocked if…

  • You initiate an outgoing (D)DoS attack
  • Your server attacks other servers (brute force, etc.)
  • Your server scans other networks (port scan, network scan, etc.)
  • Your server sends spam emails

A compromised server can manifest itself through various symptoms, depending on the type and extent of the attack. Some possible scenarios include:

  1. Unexplained network activities: If the server has been compromised, this can lead to unusual network activities that are not typically expected. This can include port scans, connections to unusual targets, or data transfers from unknown sources.
  2. Changes to firewall or security settings: An attacker may change the firewall or security settings of the compromised server to facilitate network access or take control of other devices on the network.
  3. Frequent crashes or outages: If the server is infected, this can result in frequent crashes or outages, leading to longer downtime and increased data loss.
  4. Email spam or phishing attempts: A compromised server can also be used to send spam emails or phishing attempts, which can result in the network being blacklisted as spam and damage customer trust.

It is important to take these symptoms seriously and act quickly to prevent further damage. If you suspect a compromised server, you should immediately take the necessary IT security measures to stop the attack and restore the server.

Please take server security seriously. If you leave such vulnerabilities as mentioned above (even unknowingly) open, you are legally violating our terms of service.

What to do next

If your server has been blocked for the reason “Anti-Hack”, you must contact us immediately. Additional actions are required to unblock the IP address.

  • 1: Activation fee: Load €5.00 onto your prepaid hosting account in order to have the IP address manually unblocked. Please understand that this process incurs a fee as it requires manual intervention. We do not profit from this process, but rather need to cover the associated costs.
  • 2: Reinstallation & Backups: Reinstallation of the server is mandatory to prevent further attacks and protect the network. We will handle the reinstallation. A technician can only perform a backup of your data in absolute emergencies. This intervention costs €15.00 per started 15 minutes. Please note that according to our terms of service, Section 7, Paragraph 4, you are responsible for creating backups and do not have a right to a backup.
  • 3: Confirmation: Please give us the green light that you have received the message and will take appropriate measures to prevent such a problem from occurring again. If the problem recurs, we will unfortunately have to terminate the prepaid contract, as you will have violated our terms of service again in this case.
  • 4: Activation: Afterward, the matter will be closed and we will reconnect your server to the internet!

Why does the activation cost money?

The process of unblocking the IP address and server after compromise requires manual interventions that entail technical effort. Since this process cannot be automated and the unblocking is done manually, we need to cover the associated costs.

The cost of €5.00 per process partially covers the manual interventions and technical effort required to unblock the IP address and server. We would like to emphasize that we do not profit from this process, but only need to cover the incurred costs. Therefore, we recommend our customers to take appropriate security measures to prevent misuse of their servers and avoid the costs of unblocking the IP address and server.

How can I set a PTR/RDNS entry?

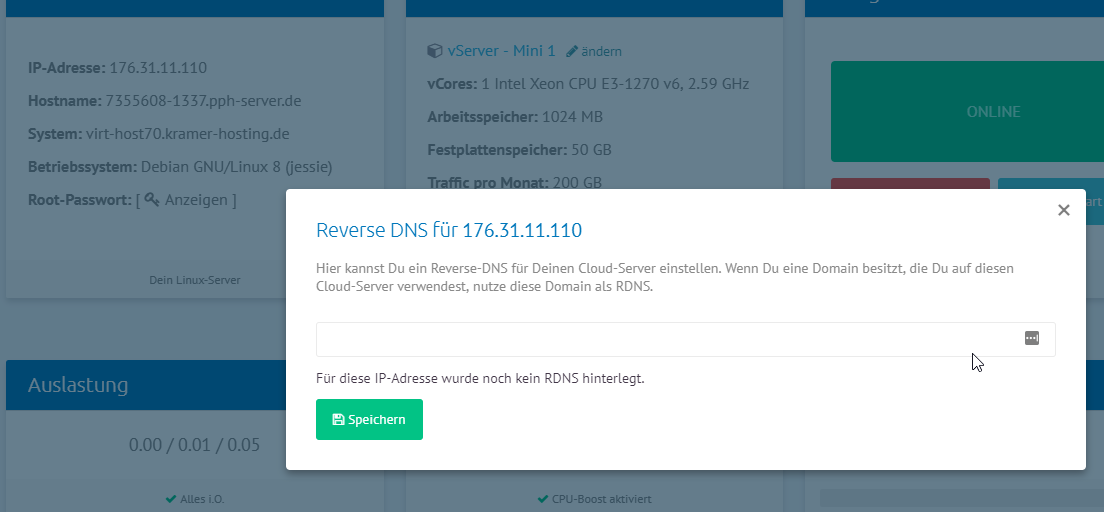
With our vServers, you have the possibility to set a PTR/RDNS entry. This is especially needed when operating a mail server. This “Record” (entry) can be easily configured in our web interface.

Setting RDNS

In our vServers, you can find a button called “RDNS” in the Cloud Manager. Click on this button to assign a domain name to the IP address of your server. If no RDNS entry has been set yet, a corresponding message will appear there. If such an entry has been set, it will be displayed there. You can change the record at any time.

Important: Please note that the chosen domain or subdomain used as the RDNS/PTR record must also resolve to the IP address of the server. This is also checked by the system in the administration area before saving.

If you still have any questions, you can always contact us in support! In case of doubt, we will set the correct PTR entry for you.

Setting RDNS

IPv6 support

If you set an RDNS in this dialog, it will also be set for the first IPv6 address (::1). If you need an RDNS for other IPv6 addresses, please feel free to contact us in support.

Install Java on vServer/Linux

In this article we will show you how to install different Java versions (1.8, 16, 17, …) on your virtual server quickly and easily.

Datei:Java-Logo.svg
Java Logo

We provide a script that installs different open source Java versions on your server. You just need to log in as root on the server and start running the automatic installation.

In this article we will show you how to install different Java versions (1.8, 16, 17, …) on your virtual server quickly and easily.

We provide a script that installs different open source Java versions on your server. You just need to log in as root on the server and start running the automatic installation.

We install different versions for you in the /usr/lib folder.

Supported versions

We install different versions for you in the /usr/lib folder.

Supported versions

Currently the following versions are supported:

jdk-13.0.1_linux-x64 -> java version "13.0.1" 2019-10-15
-> /usr/lib/jdk-13.0.1/bin/java
jre-8u241-linux-x64 -> java version "1.8.0_241"
-> /usr/lib/jre1.8.0_241/bin/java
openjdk-16.0.1_linux-x64 -> openjdk version "16.0.1" 2021-04-20
-> /usr/lib/jdk-16.0.1/bin/java
openjdk-17.0.1_linux-x64 -> openjdk version "17.0.1" 2021-10-19
-> /usr/lib/jdk-17.0.1/bin/java

Installation

To install these versions on your server, please run the following command:

bash <(wget -qO - https://pph.sh/docs/java.sh)

Alternatively, you can use the app installer to install Java.

Cloud Manager: Install Java packages

Change default version

To set the default version (java in the console), run the following command after installation:

select-default-java

Here you select which version to use as the default Java. We create a link from /bin/java to the selected version.

View available versions

To view all versions installed by the script, run the following command after running the Java installer:

show-java-versions
Example of installation

How do I create a backup daily?

You can set up the Game Server Manager to create a full backup of your game server every day at a specific time. Just follow these steps:

  • Go to the game server of your choice.
  • Wait until the Game Server Manager is fully loaded.
  • Go to the “Backups” tab.
  • Click the “Settings” button in the Contents tab.
  • Select “Create automatic backup daily” and save the settings.
Backup settings

Maximum backup quantity

The max. backup count specifies how many backups should remain stored. Before each new backup, older backups are deleted to save space. Enter 0 to not remove backups automatically. Please note that you do not have infinite memory on your server.

Stop server at backup

If you enable this option, the server will be stopped before a backup operation. After the backup is created, the server will be restarted if it was on before.

We recommend that you turn this option on. If files change during the backup process, the backup could be faulty in case of doubt.

Create automatic backup daily

If this checkbox is enabled, a backup is created daily at the specified time. We recommend creating a backup at a time when there are most likely few players connected to the server. This ensures that the backup runs faster and, if the stop option is enabled, also for less noticeable downtime.