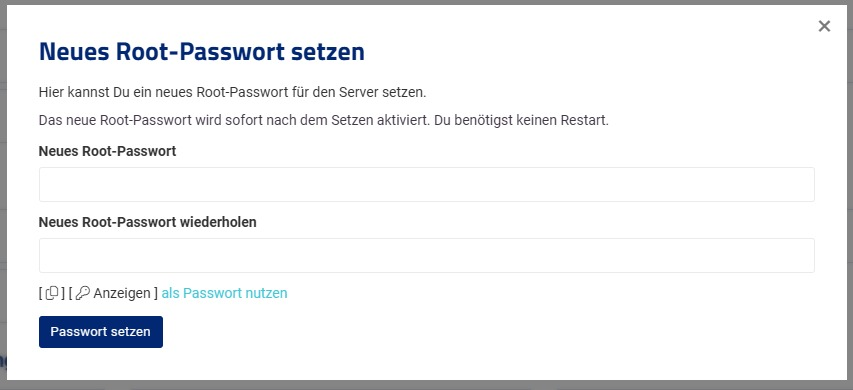
To change the root password of your virtual server, go to the Cloud Manager (vionity.de) and click on “Root Password” in the actions menu. A dialog box will open where you can enter the new root password. After submitting, your password will be reset immediately.
Reset Server Root Password
If you have any problems, please contact our support team for assistance.
Important Information:
You should disable root password authentication and only use it when accessing your server via VNC. Instead, use SSH keys.
The server must be turned on for the root password to be changed live.
To reset to the default password, you can click âUse [ Show ] as passwordâ in the dialog. The default password will then be automatically inserted in the fields.
In this article we will show you step by step how to expand the hard disk of a Windows server.
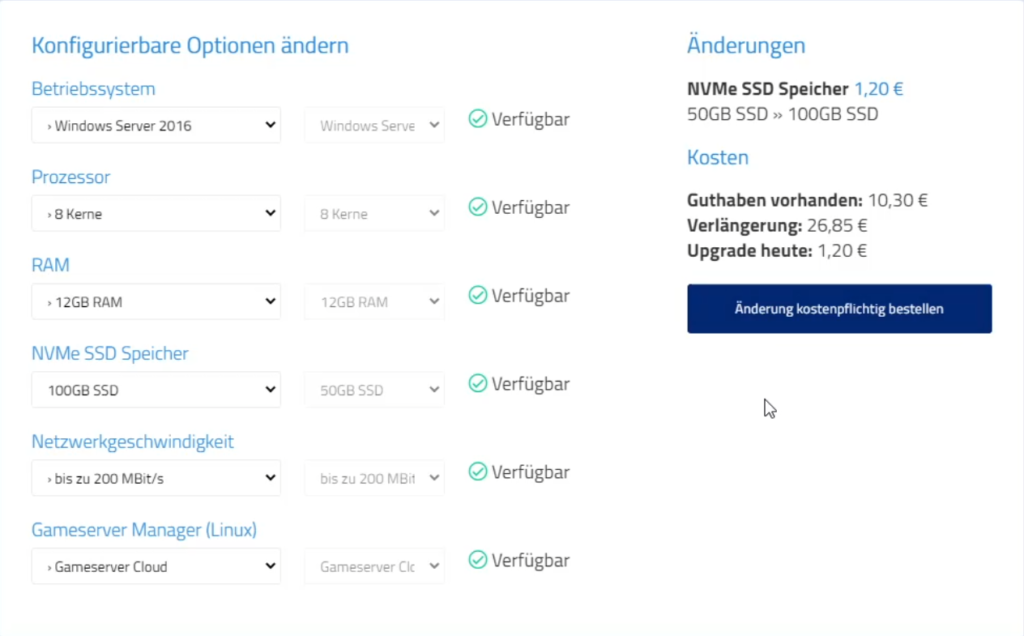
To be able to expand your hard disk, you first need “unallocated space“. So open the upgrade/downgrade form of your Windows server. Then select a hard disk upgrade.
Upgrade durchführen
Change configurable options
Order the desired configuration by clicking on “Order change with costs“.
Restart Windows Server
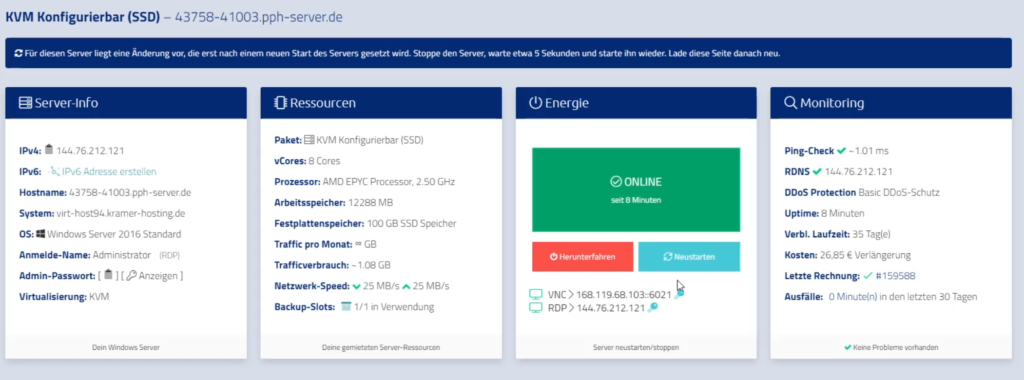
After that, go back to the Cloud Manager. Wait for about 1-2 minutes. You should see a message stating that changes are coming for the server. Perform a restart of the server.
There are changes for the server
Manually expand hard disk
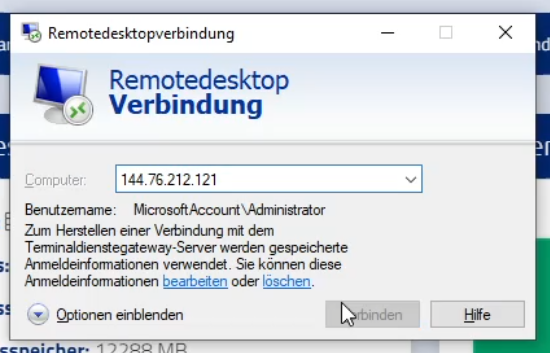
After a reboot (this may take a while, please wait patiently) connect to your Windows server via Remotedesktop.
Microsoft Windows Remote Desktop Connection
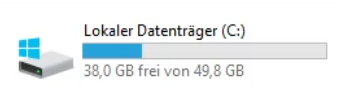
After you have logged in to the server, you can view your C: drive. It still has the same size as before. This is because we do not allocate the additional space ordered to a partition. You have to do that yourself.
C: has a size of only 50 GB
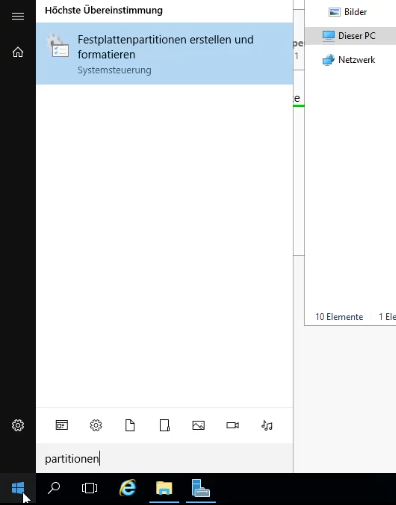
Click the Start button and search for “Partition“. You should get a program suggested. Open it. If the program is not displayed, you can also type “diskmgmt.msc“. This is guaranteed to work!
Create and format hard disk partitions
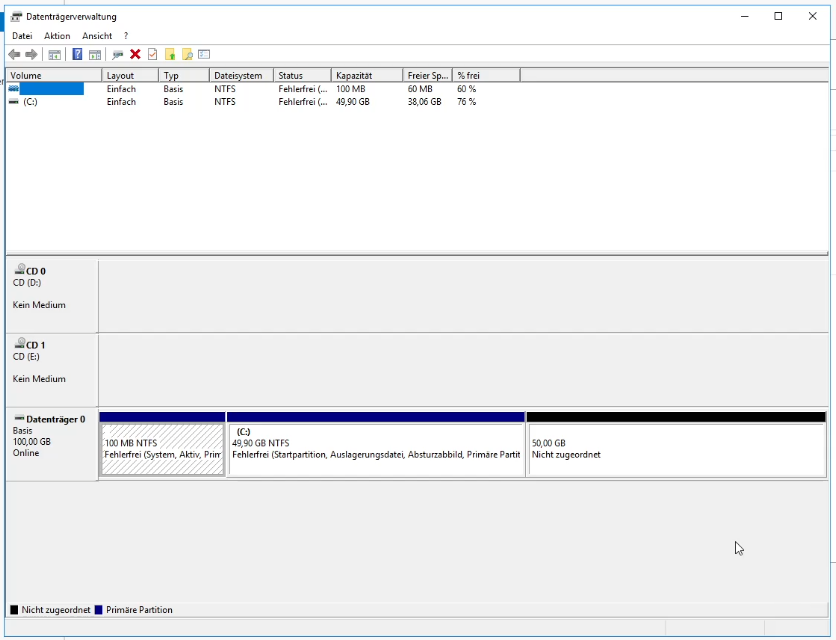
Maximize the window that opens best. Wait until the content is loaded. You should now find a black colored block. This is the unallocated memory.
Unallocated space
You now have several options to use this space. You can create a new partition from the unallocated space or append the space to C:. The latter is the most popular approach.
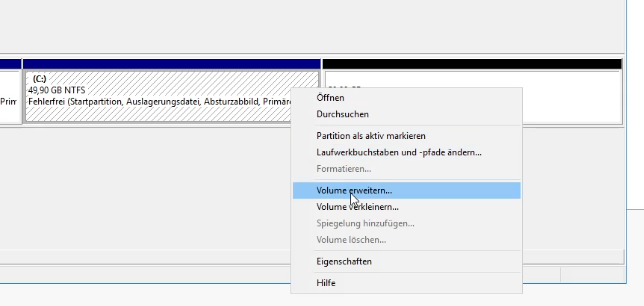
Right click on the blue colored area with the drive letter C:. In the context menu that opens, select “Extend volume“.
Expand volume
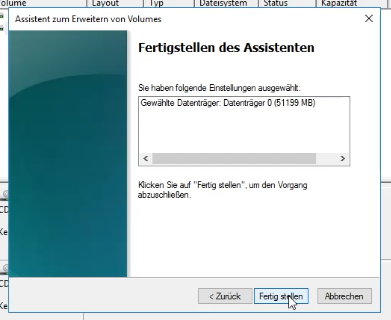
A dialog opens. It is sufficient to click on “Next” in this wizard and on “Finish” in the last step. The free memory space is automatically made as an extension.
Assistant for expanding volumes
The changes are now applied live. The process does not take long. The black colored unallocated area should now disappear and be merged with C:.
Hard disk expansion performed
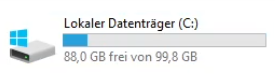
Validate the result in Explorer by looking at the size of the disk.
The hard disk was expanded
The operation is completed. The hard disk space has been increased.
If something is different during this process or if you have any problems, please contact our support at any time. We are happy to help!
No! Mining (of any kind) is basically forbidden on all virtualized servers. It is the nature of data mining that this consumes a lot of processor power.
But XYZ is not mining at all!”
– Some customer
This may be technically correct, but we still consider it an overuse of resources. The issue is not whether it is “mining”, but ultimately whether there is a high workload or above-average wear and tear due to the process. Virtual servers are not suitable for this type of program.
Possible consequences of overuse
In all likelihood, we will automatically lock your server if resources are overused or permanently exhausted. The same applies to other disturbances that originate from your server. This regulation is based on our terms and conditions §7, paragraph 2.
If it is a test server, we will delete the server immediately.
Especially with virtual servers this is a bottleneck for other customers and causes a bad quality on the host system. You rent a shared hosting and have accepted the terms and conditions when ordering. These state that permanent overloading of the server must be avoided.
Please be fair and pay attention to other people who need processing power for other programs.
If you have any further questions about this, please feel free to contact us at any time.
Docker is a container-based technology that creates Linux containers. Because it makes deep changes to the system, it might not work perfectly with every virtualization method.
You can use Docker on all virtual servers from Prepaid-Hoster. However, there are a few details you should keep in mind.
Our Recommendation Upfront
If you know you want to use Docker and want to be on the safe side, you should rent a KVM server right away.
Virtualization Technology
Compatibility
OpenVZ (no longer offered)
Possible limitations
KVM
No restrictions
Is Docker compatible with OpenVZ and KVM?
Docker on a Cloud vServer
You can usually run Docker on a Cloud vServer without any problems. However, there are some limitations. Since a Cloud vServer is managed with a container-based virtualization method (OpenVZ7), compatibility issues can arise. It is hard to say in advance which Docker images will work on an OpenVZ 7 server, as it depends on the Docker setup you need.
Another issue can be the kernel. Docker often needs newer kernel components that might not be available in the OpenVZ Virtuozzo kernel.
Docker on a KVM Server
KVM uses full virtualization. This means the guest system is independent of the host system. With a KVM server, you also get your own kernel that isnât shared or virtualized with other customers.
Because of this, you can use Docker without any restrictions on a KVM server.
If you have any questions about this topic, please feel free to contact our support team. Keep in mind that we cannot guarantee specific compatibility on Cloud servers.
In this article we will explain how you can manage your server via VNC.
With VNC you can easily access your server. The advantage is that it works even without an active network connection and SSH is not needed for authentication. VNC is the first place to go if, for example, you have broken the SSH configuration and need to undo changes.
There are two ways to connect. You can use the WebVNC directly in the web interface or you can connect directly via a program.
VNC direkt im Webinterface
So that you do not have to install an extra program, you can connect in the web interface via the browser. You will then see the input line of your virtual server in a browser window.
Open the cloud manager of the server you want to connect to
Navigate to the actions
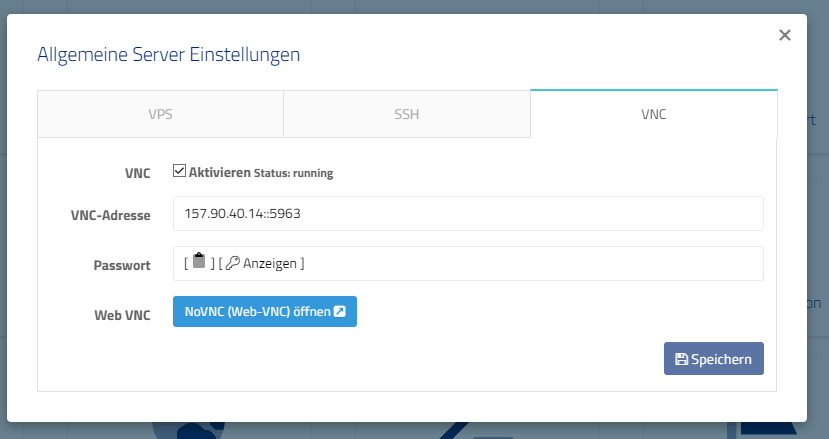
Click on VPS settings
Open the VNC tab
Enable VNC if disabled. Restart the VPS afterwards.
Click on Open NoVNC (Web-VNC)
In the new window enter the password that is displayed in the VNC tab.
Enter the password that is displayed in the web interface VNC dialog. Confirm with Enter.
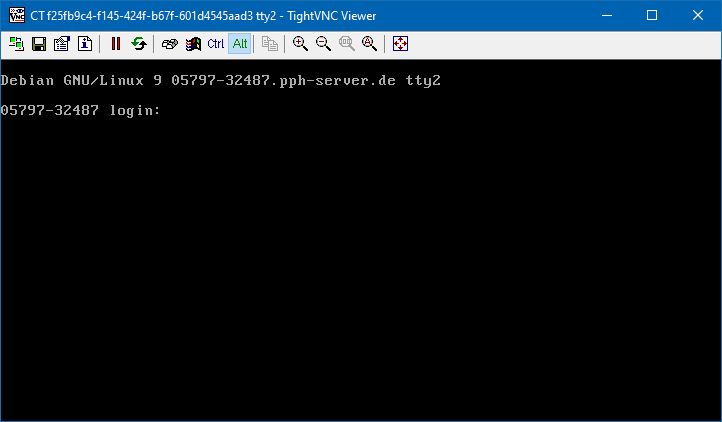
Now you are connected to your server via VNC console.
TightVNC Viewer
Please note that we change the address of your VNC server from time to time. This has security reasons. So check in the webinterface if you still have the current address.
By default, SSH uses port 22. In some cases, it might be a good idea to change your server’s SSH (Secure Shell) port. We will explain why and show you different ways to change the SSH port on your server.
Why?
Changing the default SSH port (22) can help reduce automated brute force attacks, as many bots target only known ports. Although this is not a complete security measure, it makes it harder for attackers to find the service and can significantly reduce unwanted login attempts. Additional security measures like Fail2Ban or an SSH key authentication system should still be used.
Change the SSH Port using Vionity
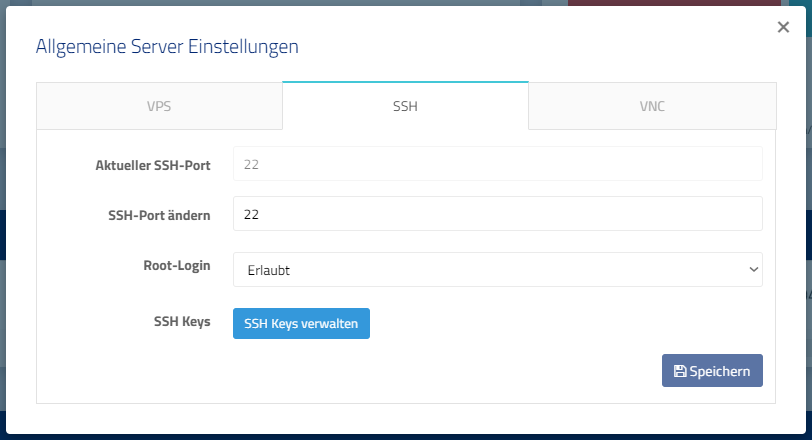
VionityCP SSH Settings
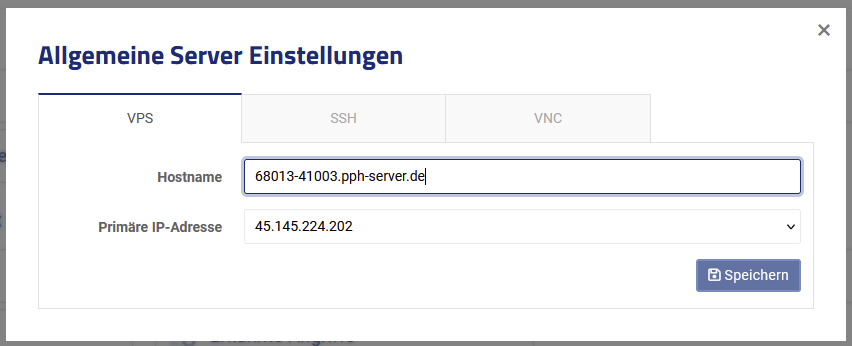
Open the Cloud Manager of the server where you want to change the SSH port.
Click on VPS Settings.
Open the tab named “SSH”.
Enter the desired SSH port in the “Change SSH Port” field. Be sure to use a free port above 1024.
Click “Save”.
The configuration will be updated in the background, and your SSH server will be restarted.
Important: If you are using a software firewall (iptables, ufw, firewalld), you must open the port first. If you forget to do this, you can easily fix it using VNC.
Manually Edit the Configuration
You can also manually edit the SSH server configuration. Here’s how.
Connect to your Linux server via SSH.
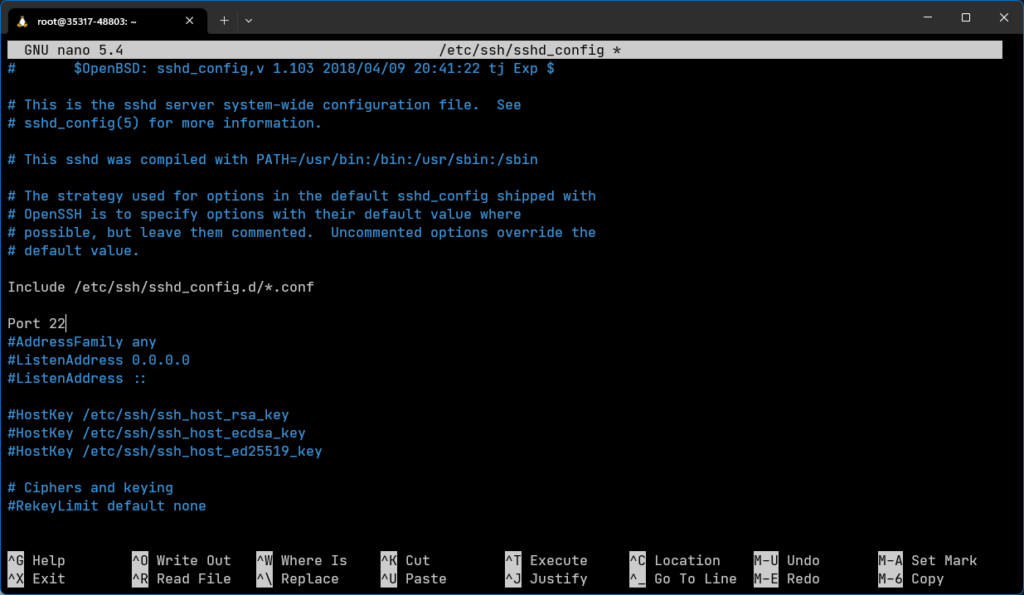
Open the file /etc/ssh/sshd_config with an editor like “nano”.
Find the line that contains “Port”. If it doesn’t exist, create it close to the top. Ensure the line doesn’t start with “#”. If it does, remove the “#”, otherwise the SSH server will ignore it.
Write the number you want to use as the SSH server port after “Port”. For example, Port 2222. Choose a port between 1024 and 65565.
The /etc/ssh/sshd_config File
Save the file.
Check if the configuration is read successfully using the command “ssh -T”. If an error appears, check your configuration.
Restart the SSH server (service ssh restart), but don’t close the SSH window yet.
Open a new SSH window and test the connection. If something doesn’t work, you can still use the first open session to fix the issue.
When Should I Not Change the SSH Port?
If your server is protected by a DDoS shield and runs a program that requires this protection, you should not change the SSH port. The reason is that the firewall can only reliably identify legitimate SSH traffic on the default SSH port (22). If the port is changed, the firewall might not recognize the SSH traffic correctly, leading to your connection being suddenly dropped and your IP address being blocked for a few minutes.
If your Windows server shows as unreachable in the web interface, please follow these steps:
Check if the server is turned on
Make sure your server is actually powered on and has fully booted up.
Check if there is an IPv6 connection
Ping your server’s IPv6 address to see if it is reachable using IPv6.
Check for a status update in the status portal
Log into our status portal and see if there is a message saying that the host system is down or under maintenance. If there is a message, please wait until it is cleared.
Stop and restart your server (if there is no status message)
If there is no message in the status portal, stop your server using the web interface and then start it again. After restarting, wait a few minutes for all services to come up.
Check if Ping is enabled in Windows
By default, Windows blocks ICMP requests. To allow ping replies, connect to your Windows server using Remote Desktop as an administrator and run the following command: netsh advfirewall firewall add rule name="All ICMP V4" dir=in action=allow protocol=icmpv4 After you run this command, your server should reply to pings again and the error in the web interface will disappear shortly.
Create a WinMTR test at home if there is packet loss
If your server still shows packet loss even though it replies to pings, run a WinMTR test from your home computer against your server’s IP address. Then send us the WinMTR results in a support ticket so we can analyze the problem further.
If you have any more questions, please do not hesitate to contact us.
If you install a MySQL or MariaDB server on your virtual server, it will be installed automatically with the “Allow local only” rule. If you want to make the server accessible from outside, you have to change the configuration of the server.
We will show you with an example (MariaDB) how to do this.
Error message which means that MySQL is not reachable from outside:
ERROR 2002 (HY000): Can't connect to MySQL server on '168.119.29.XXX' (115)
Requirements
You need a Linux server.
You must have MariaDB installed (apt-get install mariadb-server).
The port 3306 must be released in a firewall, if one is used.
You have created a user that can either access from anywhere “%” or is filtered by IP address/host.
Customize configuration
Modify the file /etc/mysql/mariadb.conf.d/50-server.cfg. Open it with an editor of your choice.
In the area under [mysqld] you will find the setting “bind-address”. Change the configuration as described below.
Before
# Instead of skip-networking the default is now to listen only on
# localhost which is more compatible and is not less secure.
bind-address = 127.0.0.1
After
# Instead of skip-networking the default is now to listen only on
# localhost which is more compatible and is not less secure.
bind-address = 0.0.0.0
Save the file and restart your database server.
systemctl restart mysql
After that, your MySQL server is also accessible from the outside. For security reasons, we strongly recommend that you create a separate MySQL account for external users. The root access should only work internally.
If you have any questions about this topic, please contact us. We will be happy to help you!
Unfortunately, we do not offer our own Windows licenses for various reasons. Therefore, our servers are only equipped with Windows Server Evaluation licenses.
You are required to provide a valid Windows Server Standard license after setting up the server, but no later than 180 days after initial installation. Alternatively, but this is explicitly not our recommendation, you can reinstall the server.
If you do not do this, your Windows server will shut down at increasingly shorter intervals.
In order to deposit a Windows Server Standard license, it is necessary to change the evaluation version to Standard.