New installation and operating system change for virtual servers in Cloud Manager
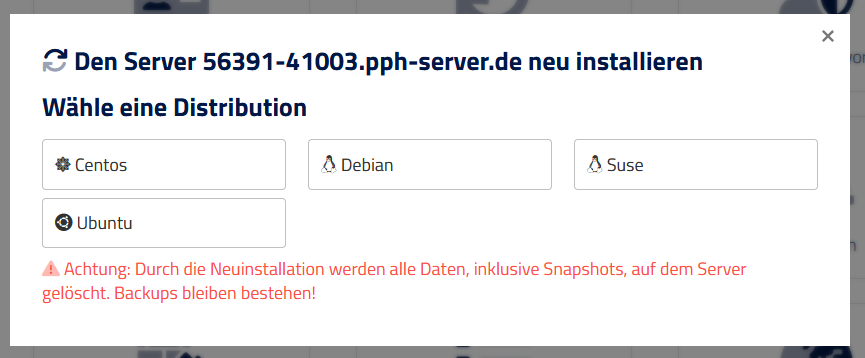
Reinstalling your virtual server via the web interface is very simple. In the Cloud Manager you will find the option “Reinstall” under the actions. There you can reinstall the server or change the operating system. Please note that a new installation will delete all data and the server will be reset. However, it is possible to perform a new installation at any time.
New installation – resetting the server dialog
How does the reinstallation of my virtual server work?
To reinstall your virtual server, navigate to the actions in the Cloud Manager and select “Reinstall”. There you can select the desired operating system or reinstall the server completely. Please note that all data will be deleted during a reinstallation, so you should make a backup beforehand.
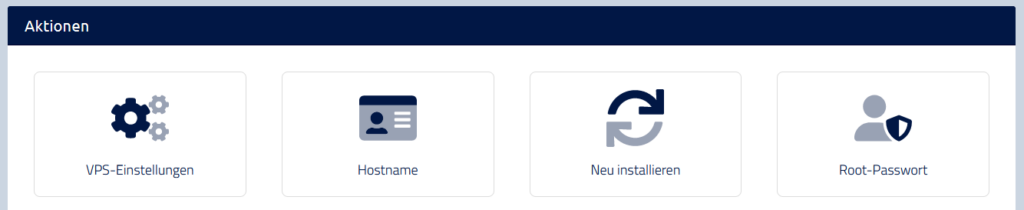
Actions in the web interface
Can I change the operating system of my virtual server?
Yes, in Cloud Manager you have the option to change the operatins systems of your virtual server. Simply select the “Reinstall” option and choose the desired operating system. However, please note that when you change the operating system, all data on the server will be deleted and you should perform a data backup.
Is it possible to reinstall my virtual server at any time?
Yes, reinstalling your virtual server is possible at any time. Simply navigate to the Cloud Manager and select the “Reinstall” option to reset the server or change the operating system. However, please note that a reinstallation will delete all data and you should perform a backup if you have important data on the server.
If your IP address is on a block list, it means that it has been identified as a source of spam or other unwanted content. This can cause emails sent from your server to be blocked by certain email providers, such as Gmail or Yahoo.
The error message may look something like this:
SMTP error 550: 5.7.1
Recipient not authorized, your IP has been found on a block list
Why can’t I send emails to Gmail or other email providers if my IP address is on a block list?
Email providers use block lists to filter unwanted emails and spam. If your IP address is on a block list, this can cause the emails sent from your server to be blocked by these providers. This can lead to important emails not being delivered and your communication being affected.
What can I do if my IP address is on a block list?
If your IP address is on a block list, you should contact our customer support. We can provide you with “clean” IP addresses that are not on block lists. This will ensure that your emails are delivered and your communication goes smoothly. Note, however, that in this case we need to know what kind of mail traffic you are sending. For private applications, we are guaranteed to always find a solution. For larger projects, such as transactional mails, we recommend other solutions.
Use DKIM & SPF
The use of DKIM and SPF can improve email delivery by verifying the authenticity of emails and ensuring that they come from a trusted sender.
DKIM (DomainKeys Identified Mail) is a method of verifying the authenticity of emails using digital signatures. It involves embedding a digital signature in the header of the email, which is verified by the receiving domain. If the signature is valid, the e-mail is classified as authentic and delivery is facilitated.
SPF (Sender Policy Framework), on the other hand, is a system that prevents emails from being sent from unauthorized servers. It involves creating an entry in the domain’s DNS record that specifies which servers are authorized to send email on behalf of the domain. When the receiving domain verifies that the server sending the email is listed in the SPF record of the sender domain, the email is delivered.
Using DKIM and SPF can improve email delivery because these systems verify the authenticity of the email and ensure that it comes from a trusted sender. This reduces the risk of emails being blocked by spam filters or moved to the spam folder, resulting in a higher delivery rate and improved communication.
A Windows server running KVM does not have a dedicated graphics card. For this reason, it is not possible to play or access games on the server because they require a graphics card.
Are there workarounds?
Thus, rendering complex 3D models or running graphics-intensive applications on a Windows server under KVM is also limited. While there are certain workarounds and solutions such as using remote desktop services or GPU passthrough technologies to provision graphics cards on virtual machines. However, these do not fit into our infrastructure.
An effective solution for accessing a graphics unit is to use a dedicated server. Here you have access to an integrated graphics unit in the processor, but its performance varies depending on the processor type.
KVM server unsuitable
Please note that KVM is a virtualization technology and is designed to host server-based applications and services. It is not intended to host desktop applications or games. If you need a server for games, we recommend that you use a dedicated game server or another dedicated hosting solution designed specifically for this purpose.
Using an SSH key has many benefits. But how do you do it? We’ll gladly explain it to you in this post. We’ll show you how to create a new SSH key on Windows and then use it for a secure connection to your vServer.
First, you need to download PuTTY in order to connect to your SSH server. You also need the puttygen.exe.
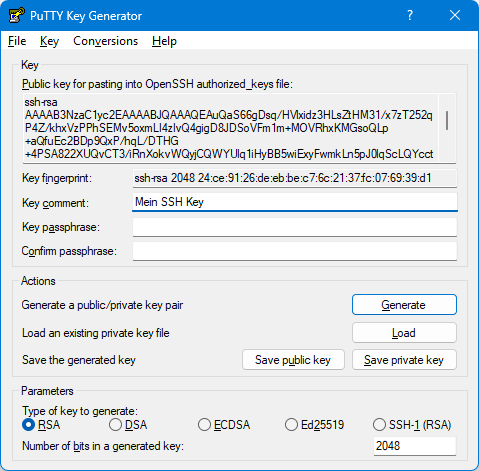
Create Private/Public Key
Launch the downloaded puttygen.exe.
To generate an SSH key, click on “Generate”. Then, move the mouse cursor randomly across the empty area. This will generate a random code for your key.
Putty Key Generator
In the “Key comment” field, enter your name or a comment for the key. In the “Key Passphrase” and “Confirm passphrase” fields, enter a secure password for your key. You can leave it blank, but it is not recommended.
All you have to do now is save the Public Key (e.g. public-key.txt) and the Private Key (e.g. private.ppk) on your hard drive.
Now connect to your vServer. Log in as Root.
Create the folder “/root/.ssh”. This folder will store the public keys. In the newly created folder, create a file called authorized_keys.
Install Key on the Server
Now open your Public Key on your computer using an editor (such as Notepad or Windows Editor) and copy its contents. The public key can be seen by others because it will be stored on the server. It is the counterpart to your private key, which you will use to log in to the server later.
Open the file with, for example, nano (nano /root/.ssh/authorized_keys), and insert the public key there.
Important: The key must start with “ssh-rsa” and must not contain new lines. Everything must be in one line. Please remove any unnecessary “new lines”.
Example key:
ssh-rsa AAAAB3NzaC1yc2EAAAABJQAAAQEArmkSugnahfqXyCeuxbHjOjTqx7VFt1l4KLY+/zTe4IgIJY+xs8TkWDi+CFaMAJlMQdknbV7v/Suio7/7fS9cvsumu0XpRsRn/hZmBQPhIZlkjJeG9lGUYS1Jr09eyT2fRUEUyb9Qqc8Wdz5eWWBk2y52/xWScgR9nbMzABmv5ucH9z1d2od8rqm93B5haLmVljxRJG3OsYPFB93M4vByj/bptcSroZhJoyKcmIvKsV+6a8HDVw47KSub4wRdACcpHjYdKIDubtEQM8z8y0pdSDxcfi/SVxD2eTewhT6j1uAT1wrTes6EO0V69EwWAa5L+n/oiMnXwSgu9Xd2AXZgRw== Dennis Ziolkowski
Save and finish. Now you just need to establish a connection using the Private Key.
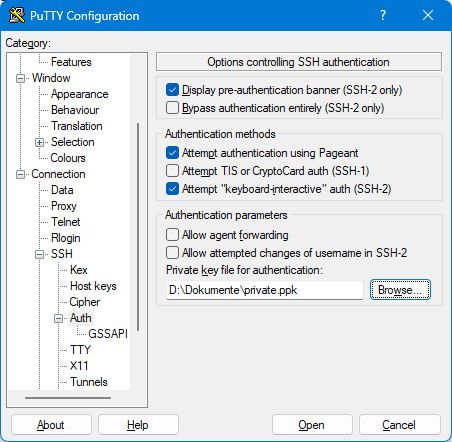
To do this, open PuTTY. Click on the entry under “Configuration > Connection > SSH > Auth” and search for your private key in the field “Private key file for authentication”.
Choose SSH Key
Go back to the “Session” entry and connect to your server as usual. It’s best to save the data under “Saved Sessions” so you don’t have to repeat the step every time.
Now the connection to your server opens. You should now be prompted to enter the passphrase for your private key. Enter the password, confirm with Enter, and voilà : you have successfully logged in to your server using your key.
Disable Password Authentication
To ensure that you can now only log in to your server using the keys from authorized_keys, you need to disable password authentication in the SSH server configuration. To do this, open the configuration file at /etc/ssh/sshd_config.
Find the line “PasswordAuthentication” and set the value to “no”. Save the configuration and restart the SSH server with “service sshd restart”. Your server is now more secure.
Take Further Security Measures
You are not 100% secure yet. For example, you should definitely change the default port of the SSH server. We also recommend installing fail2ban.
If you have any questions, please don’t hesitate to contact us.
If you use a KVM server, you may not be able to shrink your hard disk. This is because we use virtualization technology to offer you a flexible and scalable hosting solution. Our technology is based on so-called QCOW images, which are a virtual representation of your hard disk.
What is QCOW?
QCOW (QEMU Copy-On-Write) is a virtual disk file format used by QEMU and KVM (Kernel-based Virtual Machine). We would like to point out that due to the way QCOW images work, they usually do not allow for disk size reduction. This is because changes to the base disk of QCOW images are usually saved in a separate file, so it is difficult to undo changes to the base disk without rebuilding the entire QCOW image.
If your server is slow and you can’t work properly with it, you should contact us as soon as possible. While you are waiting for an answer, you can already take action and perform some checks yourself.
First of all you should check in the webinterface how much processor load your server currently has. If your processor is running at peak performance, it is normal that it reacts slowly to further tasks, because something is already keeping it 100% busy.
Workload in the web interface
If you detect high bandwidth, your server may be downloading or synchronizing with something and is therefore limited in the network and cannot work fully. Usually it is enough to wait a few minutes. If this doesn’t help, it is also possible that your server is being abused and carrying out DoS attacks. In this case, our automated security will intervene and block your server and IP in case of any abnormality.
Please also note that your server (unless you have a dedicated or KVM server) is shared hosting. Here you share the physical server hardware with several customers at the same time, which can cause slight limitations at peak times due to overuse of one customer. Also, the Mini vServers do not have quite as much processing power as the Power or High-Line models, as we have throttled the GHz of each virtual core.
If you did not find any abnormalities, it is most likely our fault. In this case, we will of course answer you as soon as possible and solve the problem directly at the root. Please note, however, that we cannot do very much during temporary peaks or large DDoS attacks.
So please be available for questions, should we have to adjust something on your server. You can also reach us on Twitter.
If Windows is not installing on your server and there is no visible progress in the installation, something has gone wrong. But don’t worry!
In most cases, it is sufficient to first install Linux Debian 11.0 on your server reinstall and then try again to install your desired version of Windows.
If that doesn’t work either, please try with a different Windows server version.
An error regarding the license key is displayed
If you see a license key error (product key), please install Windows Server 2019 instead of Windows Server 2022. Your system is not compatible with Windows Server 2022 in this case. Unfortunately, we cannot change that.
These steps didn’t work either!
If nothing works at all, feel free to contact our support. We will take a look at it! But please let us know that you have already tried the steps mentioned above, so that we can resolve the problem for you as quickly as possible.
Please use intelligent port usage to separate your programs from each other or get additional servers to distribute services across multiple IP addresses.
However, you can book up to 4 additional IP addresses for your server. Simply go to the upgrade/downgrade manager of your server. This way, you can, for example, add a second IPv4 address.
After adding the IP address, you will need to stop and restart the server.
However, please note that our gameserver manager always uses the default IP address of your server.
No. These operating systems are only suitable for use on a home PC. These versions of Windows are not suitable for use as a server operating system. We do not make an exception for security reasons.
This should not be a problem for you. Because the offered Windows server operating systems should differ from the use in contrast to the home systems only little.
You can install either Windows Server 2016 or Windows Server 2019 on your server.