My Windows RDP password isn’t working

You’re trying to access your server but it’s not working? You’re receiving a message that the login credentials are incorrect? Don’t worry! We’re here to help you. Let’s work together to get RDP access to your Windows server.

Check the installation

If you order a Windows server from Prepaid-Hoster, it will initially be delivered with a Linux system. You need to install Windows on the server through the web interface. In the Cloud Manager, “Windows Server” should be selected in the operating system field. If not, perform the Windows installation first.

VionityCP server info with login credentials

Default login credentials

You can find your login credentials in Vionity in the Cloud Manager.

IP Address See welcome email/web interface
Username Administrator
Password See welcome email/web interface
Windows Server login credentials

Troubleshooting

Check the username

Remote Desktop – Incorrect login data

Make sure you enter the correct username. By default, this should be either Administrator or LocalAccount\Administrator. Sometimes a typo or incorrect capitalization can be the cause.

Reset the password in the web interface

If you’re sure that the username is correct but the password still isn’t working, you can reset it in the web interface. Log in to your Prepaid-Hoster account, navigate to the RDP settings, and reset the password to the default value. After that, you can log in with the new password.

Use IP address instead of hostname

Try using the direct IP address of the server instead of the hostname. In some cases, this can solve connection problems caused by DNS or network issues.

Other common sources of errors and solutions

  • Typos: Double-check that you entered the password correctly. Pay attention to uppercase and lowercase letters.
  • Special characters: Sometimes certain characters in the password can cause problems. Try using a simpler password without special characters to narrow down the issue.
  • Connection settings: Verify that your network settings are correct and that you have a stable internet connection.

If the above steps don’t solve your problem, you can contact Prepaid-Hoster support. Prepare all relevant information to expedite the process. The exact error message you receive during login will be crucial – preferably send it to us.

Connecting to the server with PuTTY

In this guide, you will learn how to connect to your server using the SSH client PuTTY. We will be using example data for this purpose. If you are unsure about which data is being referred to, you can find all the data in the Cloud Manager of your virtual server.

We will be using the IP address 62.68.75.47, the default port 22, and the password cxp9zqaJ.

Connection guide

Downloading and installing PuTTY

  1. Download PuTTY: Go to the official PuTTY website and download the latest version for your operating system.
  2. Installation: Run the downloaded file and follow the installation instructions.

Starting PuTTY

  1. Open PuTTY: After the installation, open PuTTY. You will see the configuration window where you can set up your connection settings.

Configure connection settings

  1. Host Name (or IP address): Enter the IP address of your server: 62.68.75.47.
  2. Port: The default SSH port is 22. Make sure this port is entered.
  3. Connection type: Select SSH if it is not already selected.
  4. Save session (optional): If you want to save these connection settings for future use, enter a name under “Saved Sessions” (e.g. “My Server”) and click “Save”. This will allow you to easily restore the connection later. Your window should now look like this.
PuTTY settings

Establishing the connection

PuTTY Security Alert: The server’s host key…

Tip: If you receive a prompt regarding a host key, click “Yes”. This message should only appear during the first connection.

  1. Click Open: Click “Open” to establish the connection. A terminal window will open and prompt you to enter your username.
  2. Enter username: Enter root and press Enter.
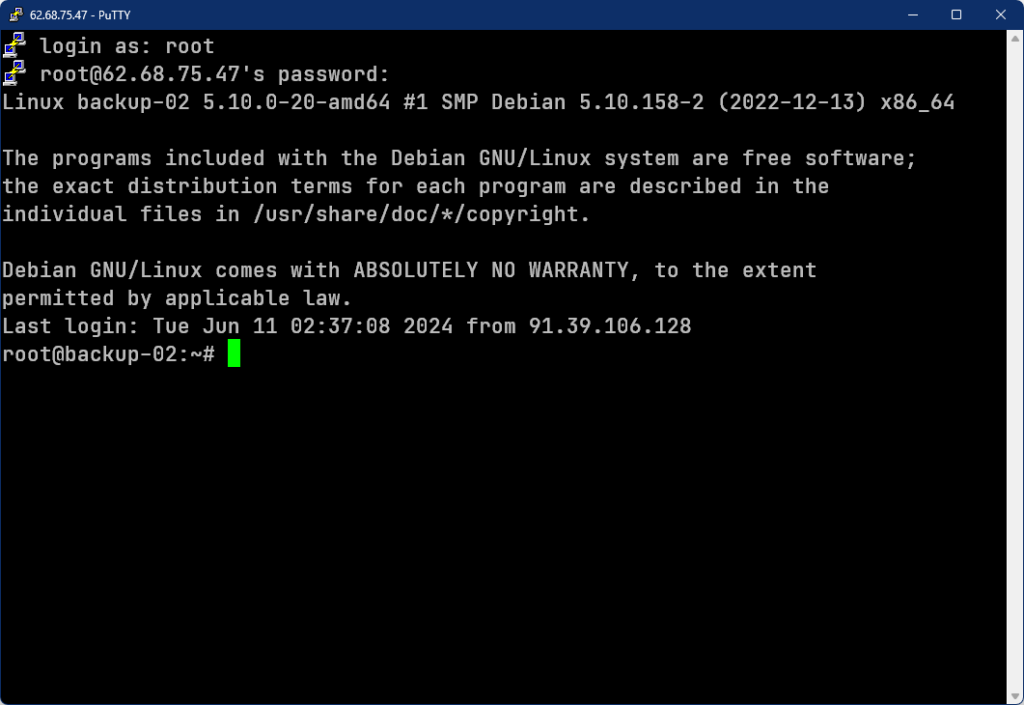
  3. Enter password: You will now be prompted for your password. Enter the password cxp9zqaJ and press Enter. Note that the password will not be displayed during input (not even as asterisks). Your terminal window should now look like this:

Successfully connected

If you have entered everything correctly, you are now successfully logged in to your server. You should see a prompt that looks like this:

root@62540-47788:~#

Now you can navigate the Linux file system, update the server to the latest version, or install programs.

How can I use additional IPv6 addresses with Linux?

IPv6 addresses offer numerous advantages for modern networks, particularly in server administration. With multiple IPv6 addresses, you can run different services on different addresses, manage security zones better, and set up virtual hosts. This improves the organization, security, and accessibility of your services.

However, when using KVM servers with Vionity, there is a challenge: Vionity overwrites the interfaces file with each restart, causing manual changes to be lost. To ensure that additional IPv6 addresses persist after each restart, alternative methods like scripts in the if-up.d and if-down.d directories are necessary. These guarantee a stable and consistent network configuration despite Vionity’s interventions.

Step-by-step guide

If you want to add additional IPv6 addresses to your default interface (e.g., eth0) and ensure that these settings persist after a reboot, follow this guide. Here, you will learn how to create scripts for if-down.d and if-up.d to add and remove the IPv6 address 2a12:edc0:4:1337::4242/64.

Make sure you have root privileges, as you will need to make changes to the network scripts.

Add IPv6 address

Create script for if-up.d:
Create a new file in the directory /etc/network/if-up.d/. Name it, for example, add-ipv6.

sudo nano /etc/network/if-up.d/add-ipv6

Content of the script add-ipv6:

#!/bin/sh
# Add additional IPv6 address when eth0 interface comes up

if [ "$IFACE" = "eth0" ]; then
   ip -6 addr add 2a12:edc0:4:1337::4242/64 dev eth0
fi

Make the file executable:

sudo chmod +x /etc/network/if-up.d/add-ipv6

Remove IPv6 address

Create script for if-down.d:
Create a new file in the directory /etc/network/if-down.d/. Name it, for example, remove-ipv6.

sudo nano /etc/network/if-down.d/remove-ipv6

Content of the script remove-ipv6:

#!/bin/sh
# Remove additional IPv6 address when eth0 interface goes down

if [ "$IFACE" = "eth0" ]; then
   ip -6 addr del 2a12:edc0:4:1337::4242/64 dev eth0
fi

Make the file executable:

sudo chmod +x /etc/network/if-down.d/remove-ipv6

Test the configuration

After creating and executing the scripts, you can restart your network interface to test the configuration:

sudo ifdown eth0 && sudo ifup eth0

Then, check if the IPv6 address has been added correctly:

ip -6 addr show dev eth0

If everything is set up correctly, the IPv6 address 2a12:edc0:4:1337::4242/64 should be displayed.

How to install an FTP server on Windows?

Would you like to set up an FTP server on your Windows server? With FileZilla Server, it’s very easy. In this guide, I will show you step by step how to proceed and how to assign specific folder permissions to a user.

Guide

Step 1: Download and install FileZilla Server

  1. Visit the FileZilla website and download the latest version of FileZilla Server.
  2. Run the installation file and follow the installation instructions. Make sure to keep the default ports.

Step 2: Configure FileZilla Server

  1. Start FileZilla Server and open the admin interface.
  2. Log in using the default information (if you kept the default values during installation).

Step 3: Create a user

  1. In the admin interface, click on “Edit” and then on “Users”.
  2. In the new window, click on “Add” and enter a username. Confirm with “OK”.
  3. Select the newly created user and go to “Shared folders”.

Step 4: Set folder permissions

  1. Click on “Add” under “Shared folders” and select the directory that the user should have access to.
  2. Set the permissions for the user, such as read, write, delete, etc.

Step 5: Set a password

  1. While you have the user selected in the “Users” window, go to “General”.
  2. Enable the checkbox “Password”.
  3. Enter a secure password and confirm it. Example:
  • Username: ftpuser
  • Password: SecurePassword123!

Step 6: Start and test the server

  1. Click “OK” to save the changes.
  2. Start the FileZilla Server by clicking on “Server” and then “Start” in the admin interface.
  3. Test the FTP connection with an FTP client by entering the IP address of your server, the username, and the password.

Important note about the firewall

Don’t forget to open the required ports in your firewall. Here is a helpful guide: Open Windows Firewall ports.

Quick guide: Opening ports

To ensure the smooth operation of your FTP server, certain ports need to be opened in your firewall:

  1. FTP port 21: For the standard FTP connection.
  2. Passive FTP ports (range 50000-51000): For passive FTP connections.

Follow these steps to open the ports:

  1. Open Windows Firewall with Advanced Security.
  2. Click on “Inbound Rules” and then “New Rule”.
  3. Select “Port” and click “Next”.
  4. Select “TCP” and enter the specific port or range (e.g. 21, 50000-51000).
  5. Select “Allow the connection” and click “Next”.
  6. Select the profiles for which the rule should apply and click “Next”.
  7. Give the rule a name (e.g. “FTP Ports”) and click “Finish”.

With this guide, your FTP server should be ready to use. Good luck!

What is the difference between KVM 2.0 and 3.0?

We have released a new generation of configurable KVM Root Servers. Let’s explain the differences.

New pricing structure

To accommodate all the new features of the web interface as well as reflect the quality of the servers, we have improved the pricing structure. The IPv4 address is now additionally calculated in the configurator. You can now book 3 additional IP addresses. The price per IP address is reduced to 0.99 Euro.

Traffic and bandwidth

Our KVM Servers 3.0 now come with 10 TB of high-speed traffic per month and up to 2 Gbit/s connection speed. Previously, it was only 2 TB with a maximum speed of 1 Gbit/s. Please note that the network traffic is subject to a strict policy.

We throttle server traffic and reserve the right to terminate the contract without notice if the following traffic is detected:

  • VPN traffic outside your own household
  • Traffic through any kind of Tor nodes
  • Torrent involving copyright-protected material
  • Proxy (similar) traffic outside your own household
  • IPTV
  • 24/7 livestreams to Twitch/YouTube, etc.

Otherwise, we are relatively unconcerned about your traffic behavior.

New web interface functions, features, and benefits

New functions for the Cloud Manager will no longer be available for the 2.0 servers. So if you want to benefit from the latest web interface features, you should get a KVM 3.0 server.

How long can I keep my old server?

Existing servers can still be used. They will continue to run as long as the server is paid for.

Can I migrate the server?

Direct migration is not possible. You would need to order a new server and set it up. You can create a backup of your old server and restore it on your new server. With prior agreement, we can transfer the old IP address to the new server for a fee of 5.00 Euro.

Affordable alternative

If you are not satisfied with the pricing of the new KVM Root Servers, we have something else for you: Our Smart Value Root Servers. These are packages based on KVM technology, but cheaper and with less flexibility.

If you only need a server without all the bells and whistles, the Smart Value Root Servers are perfect for you. We have already summarized the difference here.

What does the promotional price mean for Smart Value Root Servers?

We now offer pre-configured packages. These packages are cheaper than the configurable option. Find out more here.

What exactly do I save with the Smart Value Root Server?

The advantage is clear: when you choose one of our Smart Value Root Servers, you save immediately and consistently compared to the regular price of a configurable KVM Server. And the best part? You get this saving with a server that is hardware-identical – meaning it has the same number of cores, RAM, and storage space.

Does that mean I get less flexibility?

Not necessarily. The Smart Value Root Server is designed for projects where you have a clear idea of your requirements and they don’t change constantly. For dynamic requirements that need more specific and frequent adjustments, a configurable server might make more sense. However, even with Smart Value servers, you have the flexibility to switch between packages or add additional resources at any time as your project grows.

How can I be sure that a Smart Value Root Server is the right choice?

We recommend using our Server Finder. With just a few clicks, you’ll receive a recommendation that best suits your project – whether it’s a Smart Value or configurable option. This way, you can be sure that you not only save money but also get the exact performance you need.

What features are not available with Smart Value Root Servers?

If you choose a Smart Value Root Server, you should be aware that some options available with configurable servers are not included or are different:

  1. Contract Flexibility: Smart Value Servers cannot be canceled on an hourly basis via the web interface. The server will run for as long as you have ordered it in advance with your balance.
  2. Customization: There is no granular upgrade or downgrade function. Adjustments in fine increments, as found with configurable servers, are not possible here.
  3. Operating System Selection: Windows is not available by default with Smart Value Servers, but you can install it yourself via a custom ISO if necessary.
  4. IP Addressing: An IPv4 address is not included by default but can be added as an optional feature.
  5. DDoS Profile for IPv6: Setting a specific DDoS profile for IPv6 addresses is not possible with these servers.
  6. Data Volume: Compared to configurable servers, the included traffic volume is lower: you will receive 2 TB instead of 10 TB of traffic (KVM 3.0) per month.
  7. Network Speed: The maximum network speed is limited to 1 Gbit/s with Smart Value Servers, while configurable servers can reach speeds of up to 5 Gbit/s.

How can I cancel my server immediately and receive a refund?

If you want to cancel your server immediately, it’s no problem with us. On the web interface, you have the option to return your server (starting 24 hours after your order). You will get a prorated refund for the remaining time of your server. Within the first 30 minutes after the order, you can return your server without any fees.

Which server can be canceled per second?

Cancelling per second is possible for the following servers:

  • KVM Configurable 2.0
  • KVM Configurable 3.0
  • Webhosting (Plesk)

Cancelling per second is not possible for the following services:

  • Dedicated Server
  • Smart Value Root Server (Packages)
  • Licenses

How can I cancel my server?

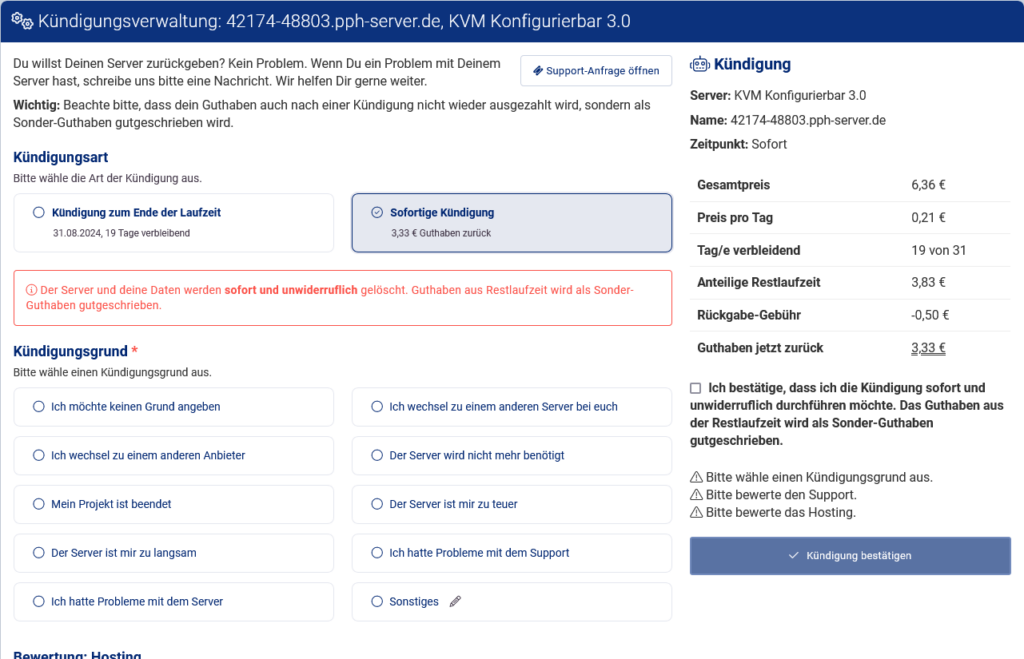
Log in to the web interface and find the server you want to cancel immediately in the navigation bar. Go to “Information”. Then click on “Cancellation Management”.


A new form will now open, where you can select “Delete immediately & receive remaining credit”. You will then see how much credit you will get back.

Cancellation Form

Cancel Server

Fill out the form step by step:

  • Select “Immediate Cancellation”
  • Select a suitable cancellation reason
  • Rate this hosting
  • Rate your experience with the support
  • Select “I confirm that I want to cancel this service at the end of the term. I do not want a renewal”.
  • Click on “Confirm Cancellation”.

Now you just need to submit the cancellation. After a few seconds, we will have canceled the server and credited the remaining balance (remaining time) to your credit account. Please note that we charge a small fee for the cancellation.

What to do if there is no internet connection after Windows installation?

It can happen that there is no internet connection after a fresh installation of Windows on your server. This problem occurs frequently and is usually caused by not having a DNS server configured in the network settings. But don’t worry, we have a simple solution for this.

Problem

You have just installed Windows on your server and find that you have no access to the internet. This can be quite frustrating, especially if you want to continue setting up your server. This problem is usually caused by Windows not configuring a DNS server by default, which is necessary for name resolution and thus accessing websites on the internet.

Solution

VionityCP: Advanced Server Management

Fortunately, we have a special feature in the Cloud Manager that can solve this problem with just a few clicks. Here’s what you need to do:

  1. Log in to the Cloud Manager: Use your login credentials to sign in to our web interface.
  2. Navigate to the advanced management options: In the main menu of the Cloud Manager, you will find the panel “Advanced Management Options”. Click on it to proceed.
  3. Set DNS server: In the advanced management options, you will find a button labeled “Set DNS server (automatically sets the nameservers in the network adapter)”. Click on this button.
  4. Wait for automatic configuration: After clicking on the button, the DNS servers will be automatically set in your network adapter. This should not take long.

Once the process is completed, your server should be able to connect to the internet. You can confirm this by trying to open a website in a browser or by executing a ping command in the command line.

What are the differences between configurable and package servers?

If you have to choose between a configurable server and a package server, there are a few differences you should consider. Package servers, often referred to as “Smart Value Root Servers”, offer solid performance and excellent value for money. They are a smart choice if you value a cost-effective solution with reliable basic features and want to keep an eye on your budget. These servers are particularly suitable if you do not need extensive web interface functions and are looking for a reliable platform without long-term commitment.

On the other hand, configurable servers offer maximum flexibility and are ideal for projects that evolve and grow. They allow you to customize and even expand server resources such as CPU, RAM, and storage space. These servers seamlessly adapt to the requirements of your project, whether you prefer Linux or Windows.


Here is a list of points that differ between the two types of servers:

  • Price advantage: Smart Value Root Servers offer a price advantage due to less flexibility.
  • Flexibility: Configurable servers are maximally flexible in adjusting resources.
  • Scalability: With configurable servers, you can scale CPU, RAM, and NVMe as needed.
  • Customization of hardware: Hardware components can be freely chosen for configurable servers.
  • Operating system: While configurable servers support various operating systems such as Windows Server 2019/2022, package servers only offer Linux systems and an ISO install system.
  • Web interface functions: If you don’t place much value on extensive web interface functions, package servers can be a good choice.
  • Immediate termination: You can return configurable servers at any time and receive the remaining term as credit. This is not possible with package servers.
  • Customer service: Both server variants offer the same 24/7 customer service via ticket.

Ultimately, it depends on what is most important for your project: cost optimization or the ability to tailor your server exactly to your needs.

Extend Windows Server Trial Period (Windows Rearm)

If you rent a Windows Server from us, we automatically equip the server with an evaluation (trial) license. This license is valid for 180 days and can be used during the system setup. After this period, a valid Windows license must be provided.

When the trial period ends, the Windows Server will automatically shut down.

Resetting the Trial Period

If your 180-day trial period is not enough, you can reset your server’s trial period up to 5 times.

Open the Windows Command Prompt as an Administrator (cmd) and enter the following command:

slmgr.vbs /rearm

This command resets the trial license period that has already elapsed. After entering this command, a server restart is necessary.

Your server is now usable for another 180 days.

License Terms

It is important to note that failing to activate Windows, even if the system seems to work fine after the intended period, constitutes a violation of the license terms agreed upon with Microsoft.