How to install windows server 2022 with iso

To install Windows Server 2022 on your KVM server, you need to go through a few important steps. This guide will show you how to do it easily and quickly. All you need to do is enable the ISO feature, activate VNC, and prepare the ISO installation. After that, the installation of Windows Server 2022 can begin smoothly!

Note: This guide may look very long and might be intimidating. However, we have documented every single step to ensure you won’t face any unexpected surprises.

Enable ISO Feature

To use the ISO feature in the web interface, you first need to activate it in the settings.

VionityCP Expert Settings: ISO Upload Enabled
  • Click on “Miscellaneous” in the left menu
  • Then open “VCP Settings”
  • Go to the “Expert Functions” tab
  • Set the “Enable ISO Upload for KVM Server” setting to “Enabled”.

A new menu entry will now appear in the navigation of your servers that are compatible with the ISO functionality, called the ISO Installer.

Activate VNC

To manually install your server later, you will need a VNC connection. This can be done easily through the browser.

  • Open the cloud manager of the server where you want to install Windows.
  • Click on “VPS Settings” in the action panel
  • Open the tab named “VNC”.
  • Enable VNC if it is not already enabled. You will need to stop and restart the server for the VNC functionality to be activated, allowing you to access the installation via the browser.
  • Close the window and stop the server. Wait patiently until the server is fully shut down.
  • Restart the server. Wait patiently until the process is complete. The system needs some time to configure VNC.

Prepare ISO Installation

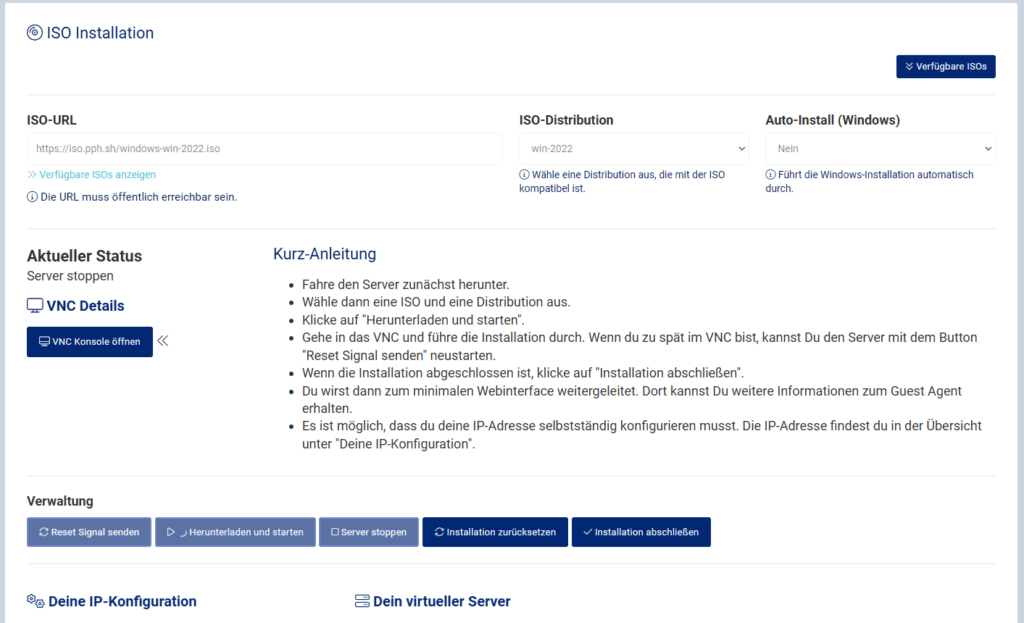
Now it’s time to open the ISO Installer. Click on the corresponding menu entry.

Then let the web interface load all the data. Here you will see all the information about installing with an ISO disk.

ISO Installer for KVM Server
  • Shut down the server via the action buttons in the ISO Installer if it is still online.
  • The ISO URL field will now be activated. Click on “Show Available ISOs” to select a predefined ISO. We have provided many ISOs for you. However, you can also enter your own URL. This must be publicly available.
  • For Windows Server 2022, open “Windows” and select Windows Server 2022.
  • You can choose a suitable distribution in the ISO Distribution list, but “win” is sufficient here.
  • When you are ready, click on “Download and Start”. The process may take a short while. You can monitor the status live.
  • Wait until the status switches to “ISO ready, installation can start”.
  • Now connect to the NoVNC web console by clicking on “Open VNC Console”.
  • If the Windows Installer does not start, you can send a reset (executed in 3 seconds) by clicking “Send Reset Signal”. Sometimes the installation starts only when any key is pressed at startup.

Install Windows Server 2022

Now you are in the Windows Server Setup.

  • Select the desired language, time zone, and keyboard layout.
  • Click on Next.
  • Click on “Install Now”
  • Wait for the setup to start.

Choose Operating System to Install

  • Now select the operating system. In most cases, you will want to install “Windows Server 2022 Standard Evaluation (Desktop Experience)”. This is the second entry. Select this one.
  • Click on Next.

Accept License Terms

  • Accept the Microsoft Software License Terms by checking the box.
  • Click on Next.

Select Installation Type

  • Click on “Custom: Install Microsoft Server Operating System only” (2nd entry).

Select Disk for Installation

You now need to load a driver so that Windows can recognize the virtual disks. We have already inserted a virtual DVD with the appropriate drivers into your server.

  • Click on “Load Driver”.
  • Click on “Browse”.
  • Find the CD drive “vz-tools-win” and navigate to
    • CD:\viostor\2k22\amd64
  • Click on “OK”.

Windows will now load the necessary drivers.

  • There should now be an entry for “Virtuozzo VirtIO SCSI controller”.
  • Click on “Next”.
  • Let Windows load the driver.
  • The drives should now be recognized.
  • Select each drive once and click “Delete”. This will remove the old operating system (Linux or Windows) from the server.
  • Select the remaining drive and click on “Next”.
  • Now Windows Server 2022 will be installed.

Wait patiently for this process to complete. The time it takes depends on the number of CPU cores. Windows will restart after the process is complete.

Prepare Windows

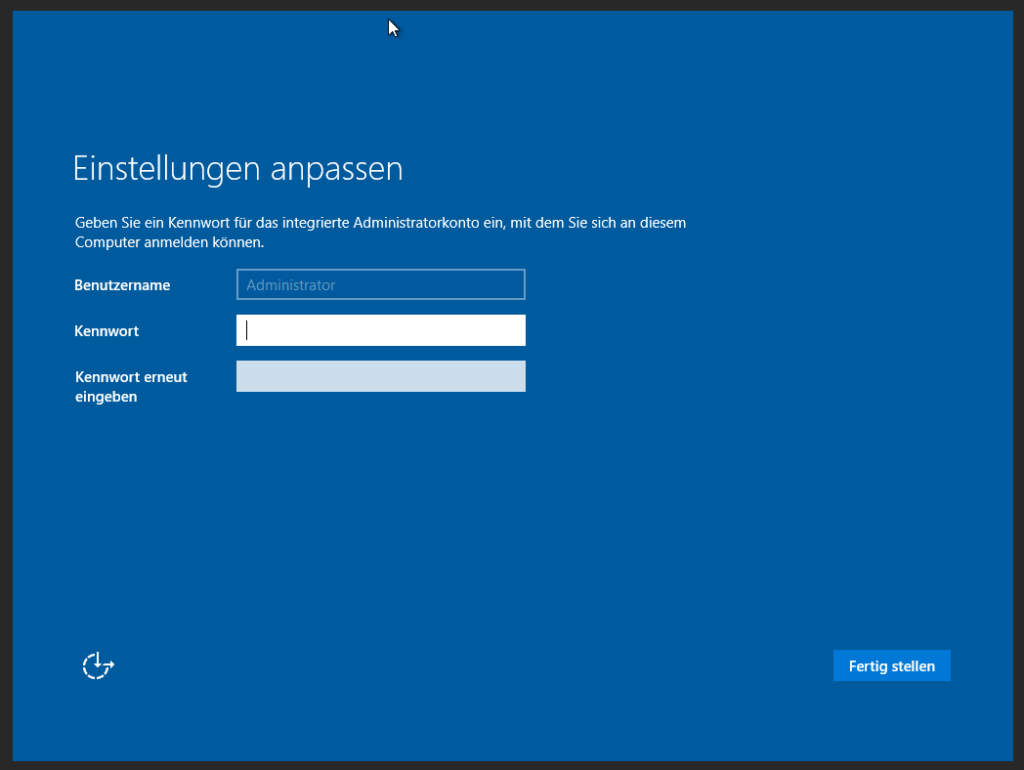
Windows has now booted from the disk.

  • Enter your desired administrator password.
  • Repeat your Windows password.
  • Confirm by pressing “Enter” or clicking on “Finish”.

First Login

We are not quite done with the preparation yet. You need to log in via VNC once and enable RDP.

  • Send a CTRL+ALT+DELETE signal to the server via VNC to access the login screen. You can find this option in the left menu panel of your VNC browser session.
  • Log in with the administrator password you set earlier.

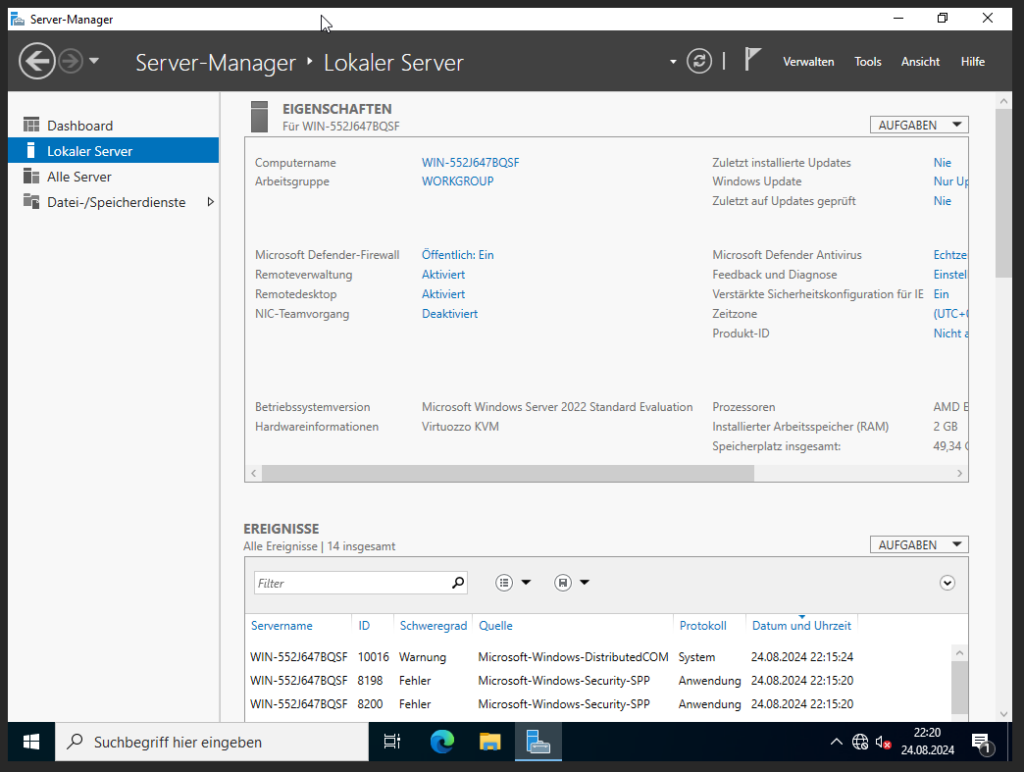
Wait for Windows to start the Server Manager.

Enable Remote Desktop

  • In the Windows Server Manager, click on “Local Server”
  • Click on “Disabled” next to “Remote Desktop”.
  • In the dialog that opens, select “Allow remote connections to this computer”.
  • Confirm the following information by clicking “OK”.
  • Uncheck “Require Network Level Authentication” (directly below).
  • Click “Apply”, then “OK”.
  • Click on the “Refresh” icon at the top of the Server Manager to ensure that Remote Desktop is now enabled.

Configure Network

Final Step: Install Network Drivers

To actually connect to your server now, Windows of course needs a network connection. By default, the drivers for the virtual network card are not installed. But once again, the included driver DVD will help.

  • Right-click on the Start button in the bottom left.
  • Select “Device Manager”.
  • Double-click on the entry with a warning triangle named “Ethernet Controller”.
  • In the dialog that opens, click on “Update Driver”.
  • Click on “Browse my computer for drivers”.
  • Click on “Browse”.
  • Again, search for the drive “Virtuozzo Tools”. Here you only need to select the drive.
  • Make sure “Include subfolders” is selected.
  • Click on “Next”.
  • Wait for Windows to install the network driver.
  • If Windows asks if the PC should be discoverable by other computers on the network, make sure to click “No”!

Complete ISO Installation

Now go back to the web interface and click on “Complete Installation” in the ISO Manager. The server will now be stopped one last time, the ISO will be removed, and the server will then be restarted.

You have now installed Windows and can connect to your server via Remote Desktop!

Can I Advertise for You?

Of course, gladly!

It’s great if you want to promote Prepaid-Hoster. In this FAQ article, we provide you with some useful information.

Positive Advertising

Your advertising should always be positive. This means it should highlight the advantages and strengths of our services. By the way, the best advertisement is your own experience! We also don’t mind constructive criticism.

The Advertising is Free

Unfortunately, there is no money for it, but we really appreciate your support! If you are curious to know if your advertising is working, we can provide you with a tracking link. Please note that this is not an affiliate system.

Logos and Designs

Our Square 💙

As a company, we want our brand to be recognizable. This is achieved through what’s called Corporate Identity. You can find information about our colors, fonts, and guidelines under PPH Logo and Colors

You can use our square logo or one of the logos with text:

  • Option 1: Our Square
  • Option 2: Prepaid Hoster with logo and text horizontally
  • Option 3: Prepaid Hoster with logo and text vertically

The logos are available in light and dark fonts. Please use either dark gray or white as the background color.

Logo without text
(SVG)
https://www.prepaid-hoster.de/logo/square.svg
Logo without text
(PNG, 900×900)
https://www.prepaid-hoster.de/logo/pph-logo-2k20-900×900.png
Prepaid Hoster with logo and text horizontally for light background https://www.prepaid-hoster.de/logo/PrepaidHosterDE-Logo-horizontal-blau.png
Prepaid Hoster with logo and text horizontally for dark background https://www.prepaid-hoster.de/logo/PrepaidHosterDE-Logo-horizontal-weiss.png
Prepaid Hoster with logo and text vertically for light background https://www.prepaid-hoster.de/logo/PrepaidHosterDE-Logo-vertikal-blau.png
Prepaid Hoster with logo and text vertically for dark background https://www.prepaid-hoster.de/logo/PrepaidHosterDE-Logo-vertikal-weiss.png
Our Logos

Our Name

It is very important that you spell our name correctly. Here are your options:

  • Prepaid-Hoster
  • Prepaid Hoster
  • Prepaid-Hoster.de

Even more important is that you call us “Hoster” and not “Host” 😉

Questions and Support

If you have any questions or want us to review your advertisement, just contact us through the ticket system.

IP not authorized to send email directly: Google rejects my emails

If you want to send an email from your server, there are many things to consider. You need a clean configuration so other mail providers do not classify your emails as spam or reject them completely. Sometimes the error messages can be a bit confusing.

If there is a configuration problem, Google might reject your emails with the following error message:

550-5.7.1 [45.145.224.X] The IP you're using to send mail is not authorized to 
550-5.7.1 send email directly to our servers. Please use the SMTP relay at your
550-5.7.1 service provider instead. For more information, go to

The IP you’re using to send mail is not authorized to send email directly to our servers. Please use the SMTP relay at your service provider instead. For more information, go to …

Why does this error occur?

Google rejects emails sent from IP addresses listed in the Spamhaus database. This is to prevent spam and unwanted emails. This can cause the error message.

How can I fix this problem?

  1. Check your IP address: Go to Spamhaus. Enter your server’s IP address to see if it is listed.
  2. Remove the IP from the list: Follow the instructions on the Spamhaus website to remove your IP address from the database. Usually, removal is immediate.
  3. Use an SMTP relay server: Instead of sending emails directly from your server, configure your mail server to use an SMTP relay server provided by your service provider. This increases the chances of your emails being delivered correctly.

If you have any questions about this topic, you can check Google’s error codes (https://support.google.com/a/answer/3726730?hl=en) or contact our support team.

How to Clone Your Server

How can I clone my server?

Cloning a server at Prepaid-Hoster is an easy process that you can complete in a few steps. Here’s how you can clone your server.

Step 1: Enable Data Backup

First, turn on data backup on your old server. This is important to ensure that all your data is securely stored.

Step 2: Create a Backup

Create a backup of your server. This will be used as a template for cloning.

  1. Go to the Backup Section: Sign in to the web interface and navigate to the backup section of your server.
  2. Start the Backup: Click on “Create Backup.” You may be asked to enter a name and description for the backup.
  3. Wait for Completion: The backup process can take a few minutes to several hours, depending on the size of your data.
Create Backup

Step 3: Get a New Server

Get a new server that has at least the same amount of disk space as the original server. This is necessary to transfer the backup to the new server.

Step 4: Transfer Backup

In the management area, select the option “Clone from Backup.”

Clone from Backup
  1. Select the Backup: In the clone section, choose the previously created backup from the list.
  2. Select Destination Server: Choose the new server to which the backup should be transferred.
  3. Confirm: Check the box “Yes, I understand that my data on the server will be deleted and replaced with the chosen backup!”
Select Server Backup

Step 5: Start Cloning Process

Click on “Transfer Backup” and confirm. You will then be redirected to the maintenance window. The server will shut down, the backup will be downloaded, and installed on the new server. This process can take varying amounts of time depending on the size of the disk.

Confirm Cloning

Following these steps should help you successfully clone your server. If you have any further questions, our support team is always here to help.

How to Use Windows Remote Desktop

This guide will help you quickly and easily log into your Windows server with Prepaid-Hoster and use the Remote Desktop connection.

Preparation:

Remote Desktop is automatically enabled on Windows servers:

  • Make a note of your server’s IP address.

Find your password in the Cloud Manager:

  • Log into the Cloud Manager and navigate to your server to retrieve the password.

Install Windows after purchase:

Go to your server in the Cloud Manager and select the option to install Windows.

Connecting

Open Remote Desktop Connection on your Windows PC

  • Press Win + R, type mstsc, and hit Enter.
  • Enter the server’s IP address and click Connect.
Windows Remote Desktop

Enter your login details

  • Username: Administrator
  • Password: Your assigned password (from the Cloud Manager)

Accept certificate warning

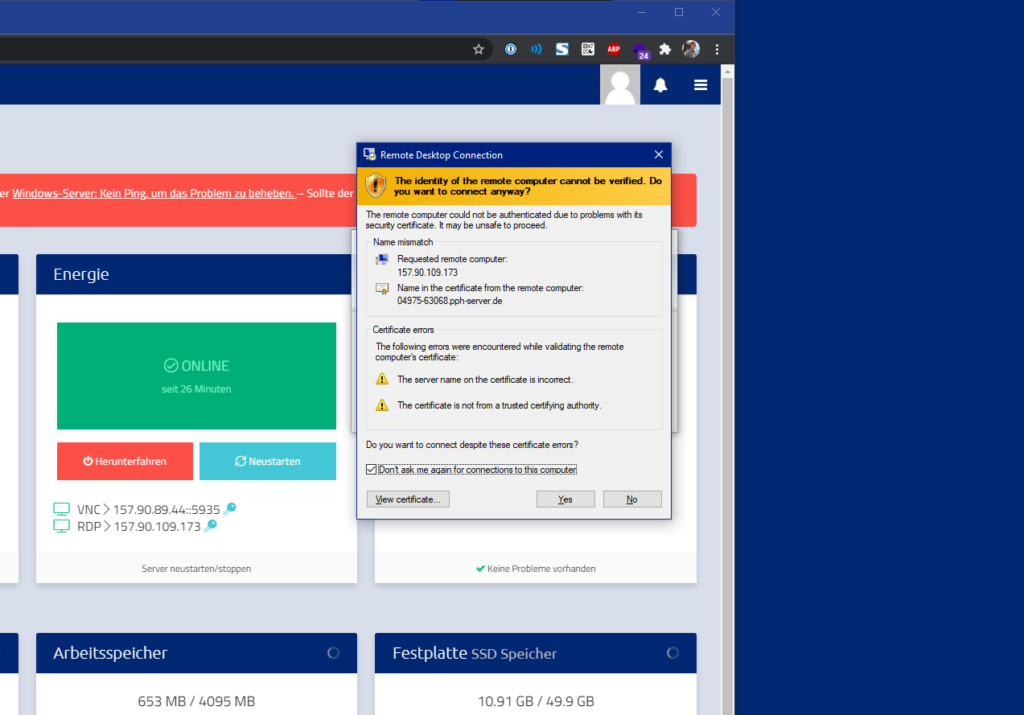
  • You may see a warning that the identity of the remote computer cannot be verified. This is because the certificate is not from a trusted certification authority.
  • Check “Don’t ask me again” and click Yes to continue the connection.
Windows Remote Desktop Certificate

Tips

  • Security: Ensure your password is strong and secure.
  • Performance: Close unnecessary programs to improve connection quality.

Conclusion

This guide helps you efficiently access your Windows server. If you encounter any issues, our support team is always available to help.

What are the Standard Ports?

To use a server effectively, it’s important to know the relevant network ports. These ports allow communication between different services and applications. Below is a list of common ports often used on Linux and Windows servers.

Program Protocols & Port(s)
Minecraft Server TCP 25565
Teamspeak UDP 9987
TCP 30033
Web Server TCP 80, 443
CS2 Server TCP 27015-27030, 27036-27037
UDP 4380, 27000-27031, 27036
RDP TCP 3389
SQL Server TCP 1433, 1434
FTP TCP 21, 20
SMTP TCP 25
IMAP TCP 143
POP3 TCP 110
LDAP TCP 389
DNS UDP 53
TCP 53
DHCP UDP 67, 68
NTP UDP 123

Linux vServer: Quick Start

Congratulations on your new Linux Root Server purchase at Prepaid-Hoster! We understand that getting started with managing your own server can be exciting.

Your server has been password-ready, so you can actually start right away!

Overview of the Cloud Manager

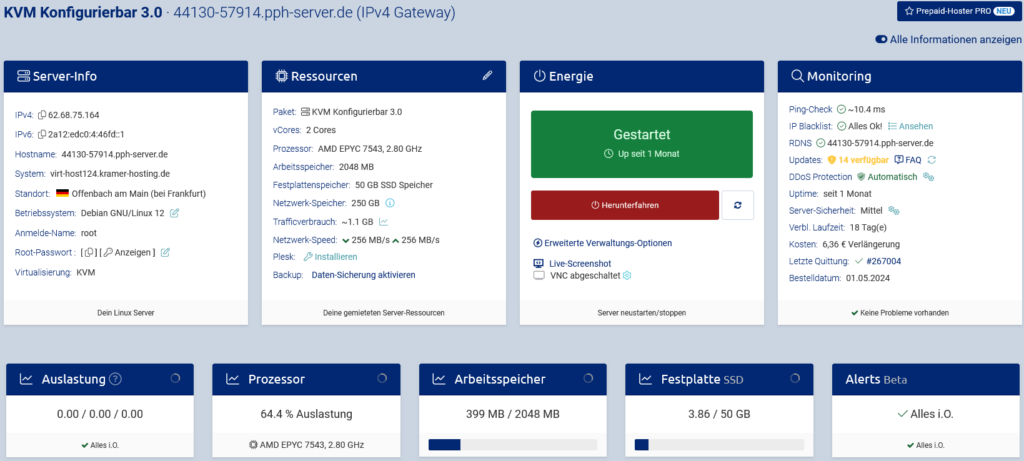
After ordering, you will be redirected to the corresponding Cloud Manager on Vionity. Here you will see an overview of your server, including:

  • Server status (Online/Offline)
  • IP address
  • Operating system
  • Available resources (CPU, RAM, storage space)
Cloud Manager Overview

Enable Advanced View

To display more information about your server in the web interface, click on “Show all information” in the top right corner of the Cloud Manager. Take a look at all the data of your new server. It is best to check if all information is displayed as you ordered.

SSH: Interact with your server

If you are using a root server from Prepaid-Hoster, you will often access it via SSH (Secure Shell). SSH allows you to securely access your server and execute commands.

Establishing a connection

First, you need to connect to your server via SSH. For this, you need an SSH client program like PuTTY or a terminal on your operating system.

The command to establish a connection looks like this:

ssh username@your-server-ip

If you are using the root user, the command could look like this:

ssh root@123.45.67.89

After entering the command, you will be prompted to enter your password. Once you have entered this correctly, you have successfully logged into your server.

My server is not reachable via SSH 🙁

Don’t worry! It can happen that your server is not reachable after ordering. The automatic provisioning of virtual servers involves a lot of tasks. It is possible that one of them is not completely successful. Often a reinstallation helps. If all else fails, support is there for you. But please check if the server is online.

Basic Navigation Commands

After successful login, you can explore the file system with various commands. Here are the most important ones:

Command Description
pwd Displays the current directory.
ls Lists the contents of the current directory.
cd Changes to another directory.
cd .. Changes to the parent directory.
cd /path/to/directory Changes to a specific directory.
Basic Navigation Commands

Useful Tips

  • Auto-completion: You can use the Tab key to automatically complete directory names. This saves time and avoids typos.
  • History: You can use the up and down arrow keys to navigate through your command history.

What’s next?

Well, that’s up to you. After all, you probably bought the server for a specific purpose. So you can get started now! But don’t forget to secure your server for production and perform regular updates.

How can I secure my Linux server?

At Prepaid-Hoster, the security of your server is our top priority. That’s why we have developed the Security Manager – a powerful tool that checks your Linux server for known vulnerabilities and provides advice on how to address these weaknesses. In this FAQ entry, you will learn about the security checks performed by the Security Manager and effective ways to secure your server.

Possible Vulnerabilities

At Vionity, we assess your Linux server for potential vulnerabilities. We focus on common weaknesses that even inexperienced users can address.

Name Issue Description
SSH Default Port Using the standard SSH port The standard SSH port (22) is widely used and therefore a popular target for attacks. Changing the port can enhance security.
FAIL2Ban not installed Lack of protection against brute-force attacks FAIL2Ban is a security program that blocks IP addresses after multiple failed login attempts. Without FAIL2Ban, the server is more susceptible to brute-force attacks.
No Root SSH Keys Authentication via password SSH keys are more secure than passwords. Without SSH keys, the server is more vulnerable to password theft and brute-force attacks.
SSH Root Password Auth enabled Allowing root login via password Direct root login via password is insecure. It is better to disable root logins or only allow them through SSH keys.
Failed Login attempts (high) Many failed login attempts Many failed login attempts can indicate brute-force attacks. This requires immediate attention and appropriate measures.
Java Root Process Running Java as root process Java processes running as root can pose a security risk as any vulnerability in Java can provide full access to the system.
TeamSpeak Root Process Running TeamSpeak as root process Running TeamSpeak processes as root can jeopardize the entire system in the event of software vulnerabilities.

Detailed Description of Security Issues

SSH Default Port

The SSH default port 22 is often the target of automated attacks. Changing this port to a less well-known number can reduce the attack surface of your server. This is a simple but effective measure to enhance security.

FAIL2Ban not installed

FAIL2Ban protects your server from brute-force attacks by blocking IP addresses after multiple failed login attempts. Without this safeguard, your server remains vulnerable to repeated attack attempts that could ultimately succeed.

No Root SSH Keys

Using SSH keys instead of passwords offers higher security. Passwords are more prone to being stolen or guessed through brute-force attacks, while SSH keys are more difficult to compromise. It is recommended to allow root access only through SSH keys.

SSH Root Password Auth enabled

Direct root logins via password should be disabled as they pose a significant security risk. It is safer to grant root access only to a regular user who can then obtain root privileges using sudo or su.

Failed Login attempts (high)

A high number of failed login attempts can indicate ongoing brute-force attacks. It is important to monitor these attempts and take appropriate measures such as blocking the attacker’s IP or implementing additional security mechanisms.

Java Root Process

Java applications should not be run as root processes as vulnerabilities in Java can lead to complete system compromise. It is safer to run Java applications with a non-privileged user.

TeamSpeak Root Process

Similar to Java, TeamSpeak should not be run as a root process. Security vulnerabilities in TeamSpeak could be exploited to compromise the entire system. It is better to run TeamSpeak with its own restricted user account.

General Advice

Regular Updates

Ensure that your system and all installed packages are regularly updated. Security updates address known vulnerabilities and enhance stability. Learn how to update your VServer on our FAQ page.

Set Up a Firewall

Use a firewall like ufw (Uncomplicated Firewall) or iptables to prevent unauthorized access. Enable only the necessary ports.

User Management

Create separate user accounts for different tasks and grant only the necessary permissions. Avoid working regularly as the root user.

Create Backups

Make regular backups of your data and configurations. Automate the backup process to prevent data loss.

Don’t Copy Commands You Don’t Understand

Look at a command before copying it into your console. A wrong rm -rf or a chmod in the wrong directory can jeopardize the security of your server and render it unusable.

Quick Solutions

Sources

If you need further information or specific guidance on implementing security measures, please let me know!

Can a test server be converted into a regular server?

Yes, it is possible to convert your test server into a regular KVM Root Server and continue using it. Here’s how it works.

Step-by-step guide:

  1. Remove cancellation:
    All test servers are automatically marked for cancellation. In order to convert the test server into a regular server, you must first remove this cancellation within the testing phase. You can do this through your customer account in the “Conditions & Configuration” section.
  2. Invoice generation:
    After the cancellation has been removed, an invoice for the server will be generated within 24 hours. You will be notified by email about the invoice generation.
  3. Pay the invoice:
    Pay the generated invoice to complete the conversion process. Once the payment is received, your test server will be converted into a fully functional KVM Root Server.

Benefits after the conversion:

  • Upgrades/Downgrades:
    After converting your test server into a regular server, upgrades and downgrades are possible. This was not possible during the testing phase. Now you can flexibly adjust CPU cores, RAM, and disk space according to your needs.
  • The server belongs to you:
    Congratulations! You have acquired your own server. We greatly appreciate your trust!
  • No commitment:
    You only use the server for as long as you need it. Don’t need your server anymore? No problem! Simply let it expire. No questions asked!

Frequently Asked Questions about converting the test server

  • Will I lose my testing time if I convert?
    No, the server will be extended by 30 days or one month. Your remaining testing time will not be lost.
  • Will my data be preserved?
    Yes, conversion is possible without restarting. Your data and settings will remain unchanged and seamlessly transferred.
  • Are upgrades and downgrades possible during the testing phase?
    No, upgrades or downgrades are not possible during the testing phase. This feature is only available after converting into a regular server.
  • How long does the conversion process take?
    The conversion process usually takes no longer than 24 hours after removing the cancellation and paying the invoice.
  • What happens if I don’t pay the invoice?
    If the invoice is not paid within the specified deadline, the server will remain in test mode and will be automatically cancelled at the end of the testing time.

My Windows RDP password isn’t working

You’re trying to access your server but it’s not working? You’re receiving a message that the login credentials are incorrect? Don’t worry! We’re here to help you. Let’s work together to get RDP access to your Windows server.

Check the installation

If you order a Windows server from Prepaid-Hoster, it will initially be delivered with a Linux system. You need to install Windows on the server through the web interface. In the Cloud Manager, “Windows Server” should be selected in the operating system field. If not, perform the Windows installation first.

VionityCP server info with login credentials

Default login credentials

You can find your login credentials in Vionity in the Cloud Manager.

IP Address See welcome email/web interface
Username Administrator
Password See welcome email/web interface
Windows Server login credentials

Troubleshooting

Check the username

Remote Desktop – Incorrect login data

Make sure you enter the correct username. By default, this should be either Administrator or LocalAccount\Administrator. Sometimes a typo or incorrect capitalization can be the cause.

Reset the password in the web interface

If you’re sure that the username is correct but the password still isn’t working, you can reset it in the web interface. Log in to your Prepaid-Hoster account, navigate to the RDP settings, and reset the password to the default value. After that, you can log in with the new password.

Use IP address instead of hostname

Try using the direct IP address of the server instead of the hostname. In some cases, this can solve connection problems caused by DNS or network issues.

Other common sources of errors and solutions

  • Typos: Double-check that you entered the password correctly. Pay attention to uppercase and lowercase letters.
  • Special characters: Sometimes certain characters in the password can cause problems. Try using a simpler password without special characters to narrow down the issue.
  • Connection settings: Verify that your network settings are correct and that you have a stable internet connection.

If the above steps don’t solve your problem, you can contact Prepaid-Hoster support. Prepare all relevant information to expedite the process. The exact error message you receive during login will be crucial – preferably send it to us.