How do I connect to my game server via FTP?

In this article, we will show you step by step how to connect to your game server using FTP.

What is FTP?

FTP stands for “File Transfer Protocol.” It is a protocol that allows you to upload and download files from your computer to your server.

You need this, for example, if you want to install worlds or plugins on your game server.

What program do I need?

There are many FTP clients that you can use to connect to your server via FTP. Our recommendation is FileZilla. Open the website and click on “Download client.” Then select the standard version. After downloading, install the client on your computer.

Where can I find the access data?

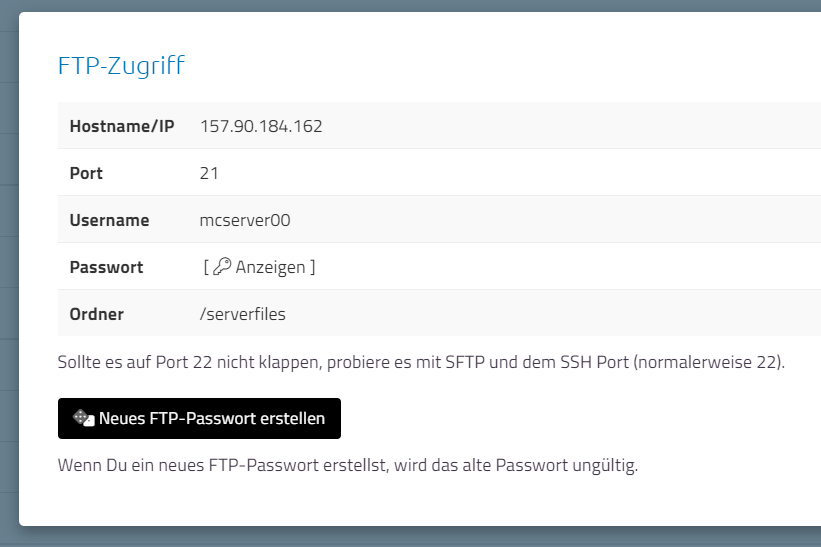
Open the “Files” tab in your game server manager and click on “FTP data.”

FTP data for a Minecraft game server

How do I connect?

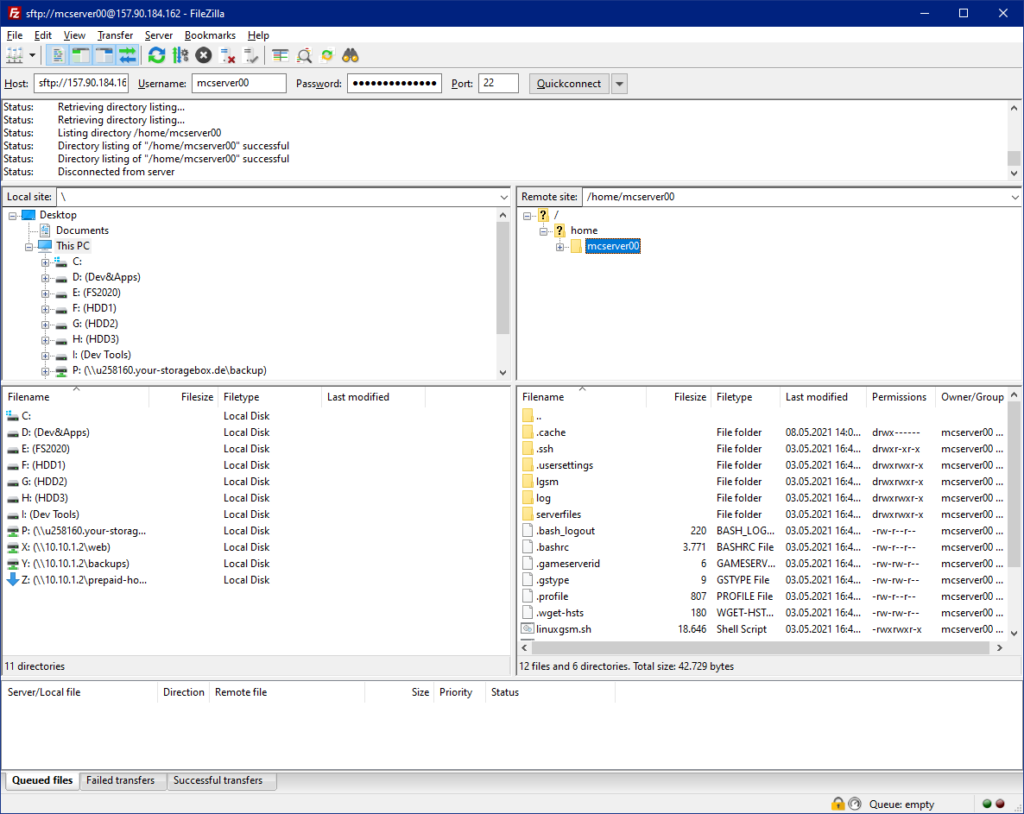
  • Open FileZilla and enter the server address (IP address of the server) in the “Server” field in the Quickconnect bar. In our example, this is 157.90.184.162.
  • Next, enter your username. In our example, this is “mcserver00”.
  • Then enter your password in the designated field. You can view and copy the password by clicking on “Show”.
  • If possible, enter “22” as the port, if “21” does not work. If you have changed the SSH port of the server, you must use the changed port.
  • Click on “Connect” or press the Enter key to connect to the server.
  • If you receive a warning message about an unknown host key, click “OK”.
FTP client connected to Minecraft server

Your computer is now connected to the FTP server of your game server.

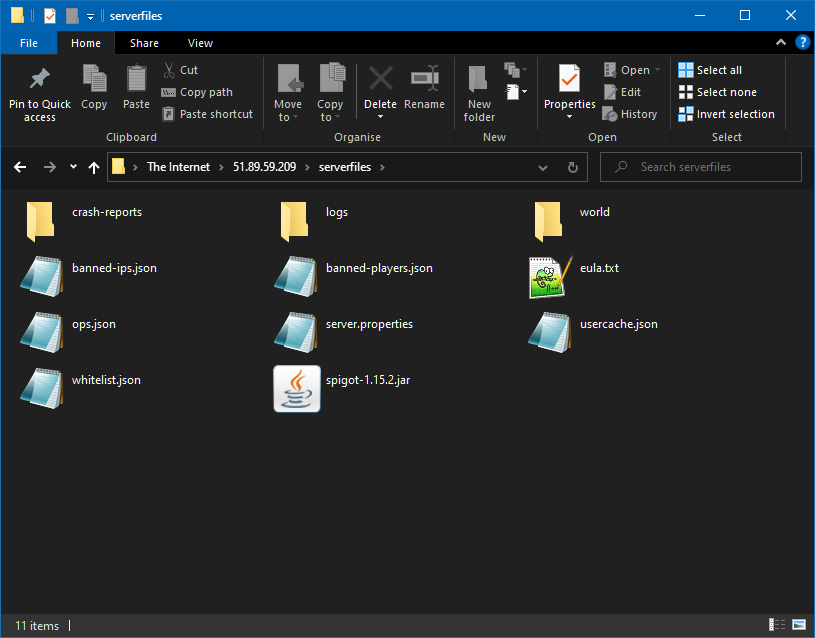
In the “serverfiles” folder, you will find all the files of the game server. Here you can drag and drop files to upload them.

If you have any questions about the FTP client or the FTP connection, please feel free to contact our support. We will be happy to assist you.

Set own LinuxGSM settings

Our game server cloud is based on LinuxGSM. To make it as easy to use as possible, our web interface VionityCP takes care of any administrative work.

Solltest Du dich mit LinuxGSM auskennen und eigene Einstellungen setzen wollen, kannst Du das gerne tun. Du musst nur einige Regeln dabei beachten.

Each server is a separate LinuxGSM instance.
During development we have refrained from installing LinuxGSM only 1x per system. We install each game server including LinuxGSM in a separate user account under /home of the Linux server.

VCP uses instance.cfg

~/lgsm/config-lgsm/gameserver/gameserver.cfg
This file is used by VionityCP to store settings. It is overwritten every time the game server is started and settings are saved.

~/lgsm/config-lgsm/gameserver/common.cfg
This file is not touched by VCP. This is the right place to insert your own LinuxGSM settings-.

~/.usersettings
You can also create a .conf file in the ~/.usersettings folder. Each file is imported from gameserver.cfg and overwrites previous settings.

If you have any questions, you can always contact us by ticket.

Which games can I install?

Supported games

The following games can be installed and are officially supported by us:

  • Minecraft-Server (Vanilla, Spigot, Bukkit, Paper, Modpacks via JAR-file…)
  • TeamSpeak 3-Server
  • Counter-Strike: Global Offensive-Server
  • Ark: Survival Evolved-Server
  • Rust-Server
  • 7 Days to Die-Server
  • Valheim Server

Experimental games

The following servers can be installed and rudimentarily managed via the web interface, but functionality is not guaranteed:

  • Action: Source
  • Action Half-Life
  • ARMA 3
  • BrainBread 2
  • Brainbread
  • Base Defense
  • Battlefield 1942
  • Black Mesa: Deathmatch
  • Ballistic Overkill
  • Blade Symphony
  • Battalion 1944
  • Barotrauma
  • Codename CURE
  • Call of Duty 2
  • Call of Duty 4
  • Call of Duty
  • Call of Duty: United Offensive
  • Call of Duty: World at War
  • Counter-Strike: Condition Zero
  • Counter-Strike
  • Counter-Strike: Source
  • Double Action: Boogaloo
  • Deathmatch Classic
  • Day of Defeat
  • Day of Defeat: Source
  • Day of Infamy
  • Don’t Starve Together
  • Dystopia
  • Eco
  • Empires Mod
  • ET: Legacy
  • Fistful of Frags
  • GoldenEye: Source
  • Garry’s Mod
  • Half-Life 2: Deathmatch
  • Half-Life: Deathmatch
  • Half-Life Deathmatch: Source
  • Hurtworld
  • Insurgency
  • Insurgency: Sandstorm
  • IOSoccer
  • Just Cause 2
  • Just Cause 3
  • Killing Floor 2
  • Killing Floor
  • Left 4 Dead 2
  • Left 4 Dead
  • Minecraft: Bedrock
  • Mordhau
  • Medal of Honor: Allied Assault
  • Multi Theft Auto
  • Mumble
  • Nuclear Dawn
  • No More Room in Hell
  • NS2: Combat
  • Natural Selection 2
  • Natural Selection
  • Onset
  • Opposing Force
  • Project Cars
  • Post Scriptum
  • Pirates, Vikings, & Knights II
  • Project Zomboid
  • Quake 2
  • Quake 3: Arena
  • Quake Live
  • Quake World
  • Ricochet
  • Red Orchestra: Ostfront 41-45
  • Return to Castle Wolfenstein
  • Rising World
  • San Andreas Multiplayer
  • StickyBots
  • Starbound
  • Source Forts Classic
  • Soldier of Fortune 2: Double Helix Gold
  • Soldat
  • Squad
  • Serious Sam 3: BFE
  • Stationeers
  • Sven Co-op
  • Terraria
  • Team Fortress 2
  • Team Fortress Classic
  • The Specialists
  • Teeworlds
  • Unreal Tournament 2004
  • Unreal Tournament 3
  • Unreal Tournament 99
  • Unreal Tournament
  • Vampire Slayer
  • Wolfenstein: Enemy Territory
  • Warfork
  • Wurm Unlimited
  • Zombie Master: Reborn
  • Zombie Panic! Source

Change Java version

This article is for Minecraft servers.

It may be that for the custom JAR you want to use, the standard version of Java is not sufficient. For this case we have taken precautions.

This is how you can change the Java version of your Minecraft server:

  • First, make sure you have all Java versions installed. To do this, go to the “Advanced Features” tab in the Minecraft server.
  • Click on “Install alternative Java versions“.
  • Wait until the process is completed. If nothing happens, simply continue!
  • Go to the “Settings” tab.
  • In the field “Path to Java Runtime” you can now switch between the available Java versions using the key icon.
  • Save your changes.
  • Start the server.

The following Java runtimes are available:

  • java (default-jre)
  • /usr/lib/jdk-13.0.1/bin/java
  • /usr/lib/jre1.8.0_241/bin/java
  • /usr/lib/jdk-16.0.1/bin/java

Minecraft 1.17 und OpenJDK 16

If OpenJDK is not available for Minecraft 1.17, please run the following command on the server as root:

bash <(wget -qO - https://pph.sh/docs/java.sh)

Now set /usr/lib/jdk-16.0.1/bin/java as Java runtime!

It is best to try these entries before contacting support.

Install alternative Java versions

If you have any problems, create a problem-report or contact our ticket support.

What is the meaning of experimental?

You can select a lot of games in the web interface. However, we have not tested all of them and have not added them all ourselves. We have automatically added all games from https://linuxgsm.com/servers/ in the Game Server Manager.

There are no advanced settings for experimental game servers in the web interface. However, you can create your own LinuxGSM configurations and also edit game server configurations manually (via FTP or file browser) if you are familiar with them.

Please note that we cannot provide support for “Experimental Game Servers”.

Which servers we offer, you can read here.

How to install Valheim Plus

In this article, we will show you how to quickly and easily install Valheim Plus with your Gameserver Manager.

First, please create a normal Valheim server. Please wait for the installation to complete. Start the server once to create all the necessary files.

Installing Valheim Plus is then quite simple:

  • Stop the server
  • Download the file UnixServer.zip from https://github.com/valheimPlus/ValheimPlus/releases/
  • Extract the contents of the ZIP folder somewhere on your computer
  • Upload the extracted files to your server’s /serverfiles folder using FTP
  • In the settings, specify “./start_server_bepinex.sh” as the start file
  • Start the server again. Valheim Plus is now installed.

Please note: In order for all your friends to connect to this server, the Plus Mod must also be installed on the client. Please use the WindowsClient.zip for that.

How do I change the Minecraft server version?

This article is for Minecraft servers.

You can use your own server versions with the Game Server Manager. By default, the latest vanilla server version is installed.

First you need the JAR file of the server you want to use. You can find the different Vanilla/Spigot/Bukkit & Forge servers at the following links:

When you have found the right file, you can proceed.

  • Make sure that your game server is stopped.
  • Log into your game server via FTP.
  • Go to the /serverfiles folder.
  • Delete all worlds here, if any, to make your server work. Old worlds may not be compatible with your new Minecraft version. You can also keep the server.properties.
  • Upload the jar file via FTP. Wait until the process is completely finished (image 1)
  • Go to the “Settings” tab in the Game Server Manager.
  • In the “The Minecraft Server Filename” field, specify the name of the jar file you uploaded. Attention: Do not specify the extension “.jar”. (Image 2)
Image 1: spigot-1.15.2 from getbukkit.org
Figure 2: spigot-1.15.2 as startup file

Now you can start your server. The startup process may take a while.

Install Modpack

To use a modpack with the Gameserver Manager, please proceed as follows:

  • Upload the complete modpack and specify the correct .JAR file in the configuration. For most modpack servers, this is a file named “forge“. If no .JAR file can be found, the modpack is not compatible with GS Manager.
  • Possibly the server must be started once via a start.bat on the own computer at home. Then upload the entire content completely via FTP.
  • Most modpacks require Java version 1.8. Change it according to our instructions.

If the server does not start, please create a problem-report.